Difference between revisions of "Biometric Fingerprint for Windows Credential Provider"
(→Supported models) |
(→Configuration for Fujitsu PalmSecure-F Pro Biometric Reader) |
||
| (29 intermediate revisions by the same user not shown) | |||
| Line 5: | Line 5: | ||
= Overview = | = Overview = | ||
| − | With Biometric | + | With Biometric for WCP, you can enrol the user's fingerprint or palm, use it as a 2FA, or just to identify the username. |
= Prerequisites = | = Prerequisites = | ||
| Line 11: | Line 11: | ||
AuthControl Sentry v4.0.5 onwards | AuthControl Sentry v4.0.5 onwards | ||
| − | [[Windows_Credential_Provider|AuthControl Credential Provider]] v5.4. | + | [[Windows_Credential_Provider|AuthControl Credential Provider]] v5.4.5 onwards |
Windows 10 | Windows 10 | ||
| − | Nitgen biometric reader or Laptop supporting biometric authentication (Windows Hello) with integrated fingerprint reader | + | Nitgen biometric reader, Fujitsu PalmSecure-F Pro biometric reader or Laptop supporting biometric authentication (Windows Hello) with integrated fingerprint reader |
| + | |||
| + | == Supported models == | ||
| + | |||
| + | Nitgen Fingkey Hamster | ||
| + | |||
| + | Fujitsu PalmSecure-F Pro | ||
| + | |||
| + | Dell, HP and Lenovo Laptops with Windows 10 using Windows Biometric Framework | ||
| + | |||
| + | The following have been tested successfully: | ||
| + | |||
| + | - Dell Vostro 15 5568 | ||
| + | |||
| + | - HP Probook 6550b | ||
| + | |||
| + | - Lenovo Thinkpad 13 Gen 2 | ||
| + | |||
| + | - Lenovo Thinkpad T520 | ||
= Nitgen Reader vs Laptop Reader = | = Nitgen Reader vs Laptop Reader = | ||
| Line 35: | Line 53: | ||
= Configuration for Nitgen Biometric Reader = | = Configuration for Nitgen Biometric Reader = | ||
| − | === Configure Third Party Authentication === | + | === Configure Third Party Authentication Nitgen === |
In AuthControl Sentry Management Console, add the following Third Party to Server > Third Party Authentication | In AuthControl Sentry Management Console, add the following Third Party to Server > Third Party Authentication | ||
| Line 49: | Line 67: | ||
=== Configure Credential Provider === | === Configure Credential Provider === | ||
| − | Select in Authentication -> Method the option " | + | Select in Authentication -> Method the option "Biometric". |
Select in Authentication -> Biometric Reader the option "Nitgen". | Select in Authentication -> Biometric Reader the option "Nitgen". | ||
| − | === Enrol the user === | + | [[Image:ACD NitGen.png]] |
| + | |||
| + | === Enrol the user with Nitgen === | ||
When the user is not enrolled, the user is requested, after login with username and password, to enrol the fingerprint. | When the user is not enrolled, the user is requested, after login with username and password, to enrol the fingerprint. | ||
| Line 63: | Line 83: | ||
[[Image:Nitgen finger 2.jpg|1000px]] | [[Image:Nitgen finger 2.jpg|1000px]] | ||
| − | === Authenticating === | + | === Authenticating with Nitgen === |
After authenticationg with username and password, when requested, place the finger on the sensor | After authenticationg with username and password, when requested, place the finger on the sensor | ||
| Line 70: | Line 90: | ||
= Configuration for Laptop Biometric Reader = | = Configuration for Laptop Biometric Reader = | ||
| − | |||
| − | |||
| − | |||
| − | |||
| − | |||
| − | |||
| − | |||
| − | |||
| − | |||
| − | |||
| − | |||
| − | |||
| − | |||
| − | |||
=== Configure Third Party Authentication === | === Configure Third Party Authentication === | ||
| Line 113: | Line 119: | ||
=== Configure Credential Provider === | === Configure Credential Provider === | ||
| − | Select in Authentication -> Method the option " | + | Select in Authentication -> Method the option "Biometric". |
Select in Authentication -> Biometric Reader the option "Native". | Select in Authentication -> Biometric Reader the option "Native". | ||
| − | [[Image:Native | + | Click Apply. |
| + | |||
| + | [[Image:ACD Native.png]] | ||
=== Enrol the user === | === Enrol the user === | ||
| − | After selecting "Native", | + | After selecting "Native" '''and clicking Apply''', click in the button “New Enroll” to open the "BioEnrol" executable. |
Select option 1 to start a new enrol to current user and follow the steps presented. | Select option 1 to start a new enrol to current user and follow the steps presented. | ||
| Line 131: | Line 139: | ||
With all configurations done, go to the Windows login page and access using your registered fingerprint when prompted. | With all configurations done, go to the Windows login page and access using your registered fingerprint when prompted. | ||
| − | [[Image:Native | + | [[Image:Biometric Native.png]] |
| + | |||
| + | = Configuration for Fujitsu PalmSecure-F Pro Biometric Reader = | ||
| + | |||
| + | '''(This section is under construction / The Fujitsu PalmSecure-F Pro Biometric Reader is in Beta testing)''' | ||
| + | |||
| + | === Configure Third Party Authentication PalmSecure === | ||
| + | |||
| + | In AuthControl Sentry Management Console, add the following Third Party to Server > Third Party Authentication | ||
| + | |||
| + | '''Identifier:''' PalmSecureReader | ||
| + | |||
| + | '''Class:''' com.swiveltechnologies.pinsafe.server.thirdparty.FingerprintNitgen | ||
| + | |||
| + | '''Enabled:''' yes | ||
| + | |||
| + | [[Image:Thirdparty PalmSecure.png]] | ||
| + | |||
| + | === Configure Credential Provider PalmSecure === | ||
| + | |||
| + | Select in Authentication -> Method the option "Biometric". | ||
| + | |||
| + | Select in Authentication -> Biometric Reader the option "PalmSecure". | ||
| + | |||
| + | Click Apply. | ||
| + | |||
| + | [[Image:ACD PalmSecure.png]] | ||
| + | |||
| + | === Enrolment with PalmSecure === | ||
| + | |||
| + | [[Image:PalmSecure Enrolment.png]] | ||
| + | |||
| + | === Authenticating with PalmSecure === | ||
| + | |||
| + | [[Image:PalmSecure Authentication.png]] | ||
| + | |||
| + | === Identification with PalmSecure === | ||
| − | [[Image: | + | [[Image:PalmSecure Identification.png]] |
= Biometric Identification = | = Biometric Identification = | ||
Latest revision as of 11:38, 4 October 2019
Contents
Overview
With Biometric for WCP, you can enrol the user's fingerprint or palm, use it as a 2FA, or just to identify the username.
Prerequisites
AuthControl Sentry v4.0.5 onwards
AuthControl Credential Provider v5.4.5 onwards
Windows 10
Nitgen biometric reader, Fujitsu PalmSecure-F Pro biometric reader or Laptop supporting biometric authentication (Windows Hello) with integrated fingerprint reader
Supported models
Nitgen Fingkey Hamster
Fujitsu PalmSecure-F Pro
Dell, HP and Lenovo Laptops with Windows 10 using Windows Biometric Framework
The following have been tested successfully:
- Dell Vostro 15 5568
- HP Probook 6550b
- Lenovo Thinkpad 13 Gen 2
- Lenovo Thinkpad T520
Nitgen Reader vs Laptop Reader
There are some relevant differences with both types of readers that need to be considered.
1) Enrolment
- Nitgen Reader: enrolment is done during the first login
- Laptop Reader: the user cannot be enrolled during login, so enrolment is done inside AuthControl Credential Provider Configuration
2) Authentication in multiple devices
- Nitgen Reader: allows to authenticate in several devices with only one enrolment
- Laptop Reader: enrolment in each one of the devices is necessary
Configuration for Nitgen Biometric Reader
Configure Third Party Authentication Nitgen
In AuthControl Sentry Management Console, add the following Third Party to Server > Third Party Authentication
Identifier: FingerprintNitgen
Class: com.swiveltechnologies.pinsafe.server.thirdparty.FingerprintNitgen
Enabled: yes
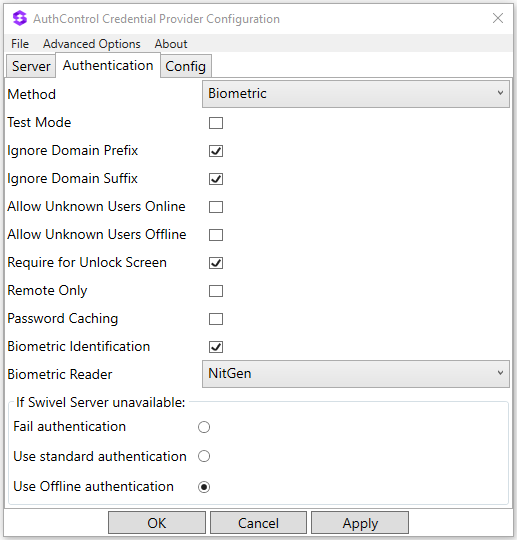
Configure Credential Provider
Select in Authentication -> Method the option "Biometric".
Select in Authentication -> Biometric Reader the option "Nitgen".
Enrol the user with Nitgen
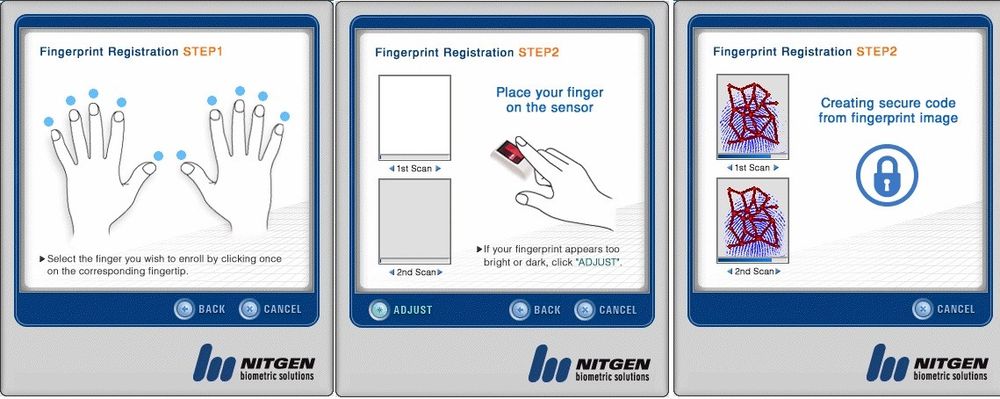
When the user is not enrolled, the user is requested, after login with username and password, to enrol the fingerprint.
1) Select the finger to enrol
2) Place the finger on the sensor the necessary times untill the enrolment is successfull
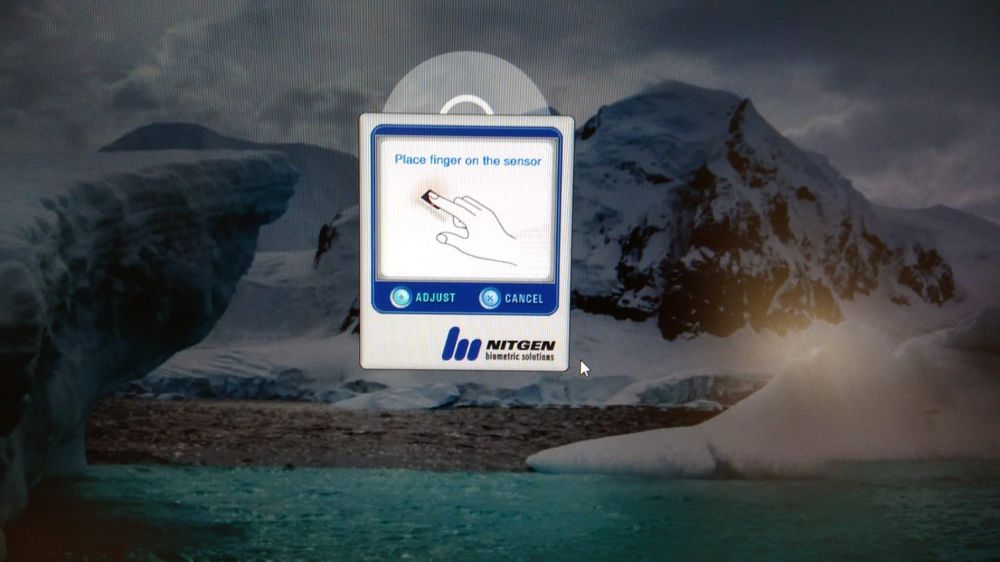
Authenticating with Nitgen
After authenticationg with username and password, when requested, place the finger on the sensor
Configuration for Laptop Biometric Reader
Configure Third Party Authentication
In AuthControl Sentry Management Console, add the following Third Party to Server > Third Party Authentication
Identifier: WinBioFingerprint
Class: com.swiveltechnologies.pinsafe.server.thirdparty.FingerprintNitgen
Enabled: yes
Disable Windows Hello
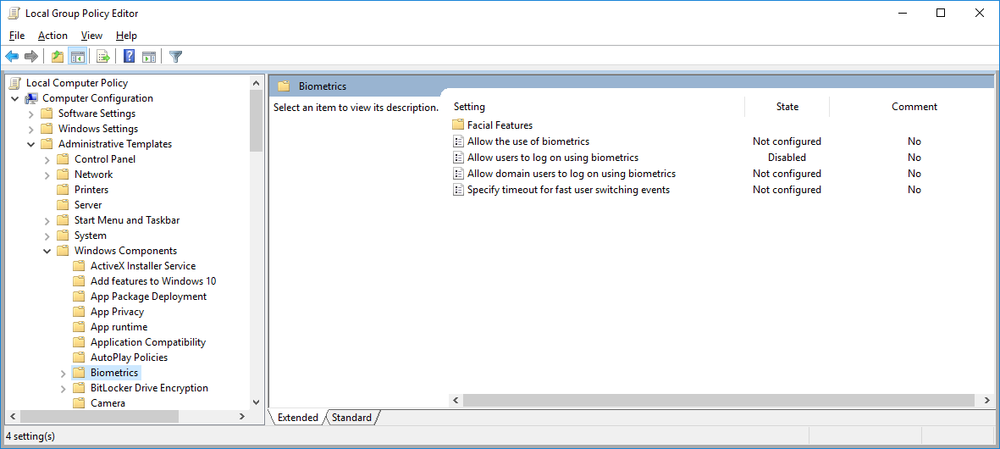
Windows Hello Biometric usage must be disabled in Local Group Policy:
- Access the Windows Local Group Policy Editor.
- Go to: Computer Configuration > Administrative Templates > Windows Components > Biometrics and disable the setting "Allow users to log on user biometrics".
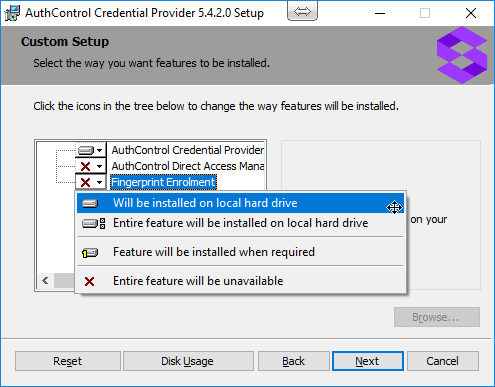
Install Credential Provider with Fingerprint Enrolment
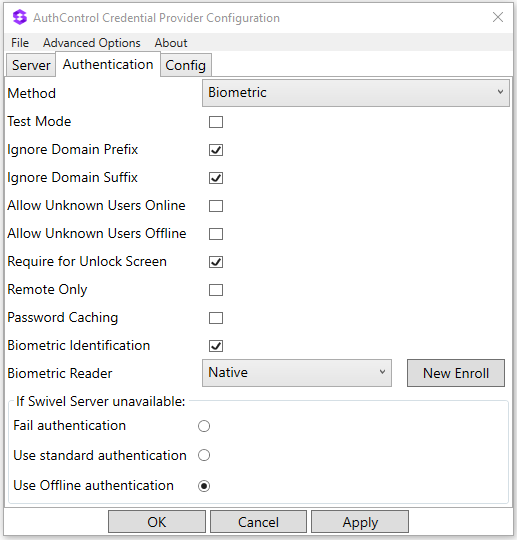
Configure Credential Provider
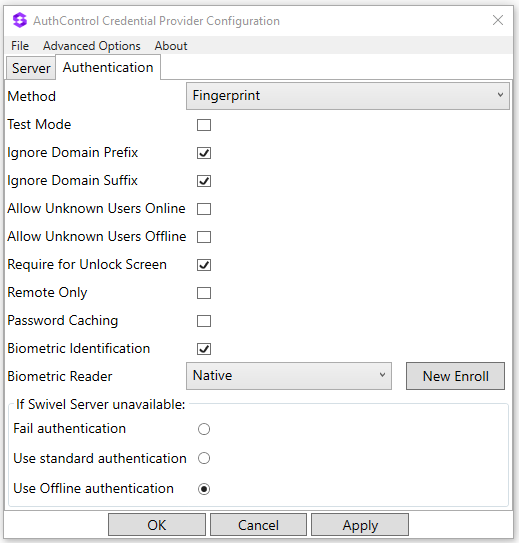
Select in Authentication -> Method the option "Biometric".
Select in Authentication -> Biometric Reader the option "Native".
Click Apply.
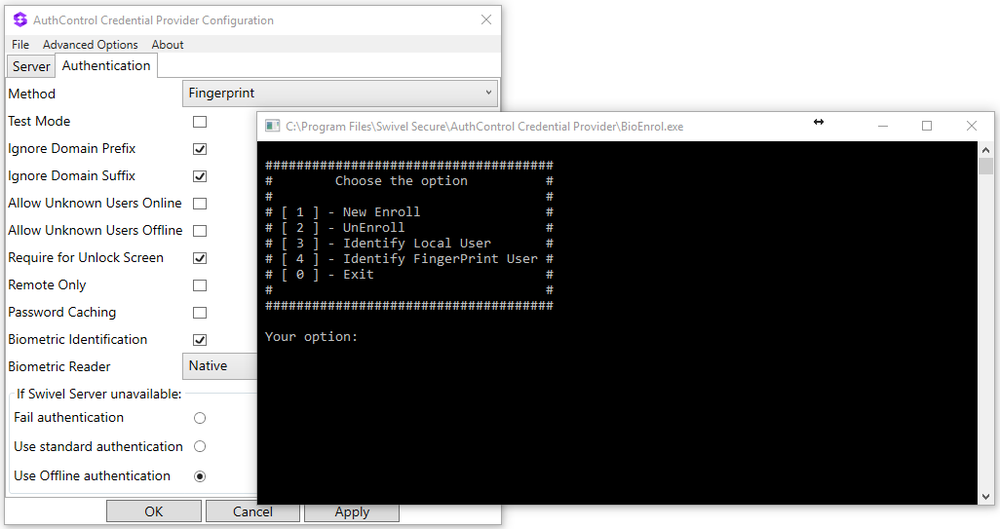
Enrol the user
After selecting "Native" and clicking Apply, click in the button “New Enroll” to open the "BioEnrol" executable.
Select option 1 to start a new enrol to current user and follow the steps presented.
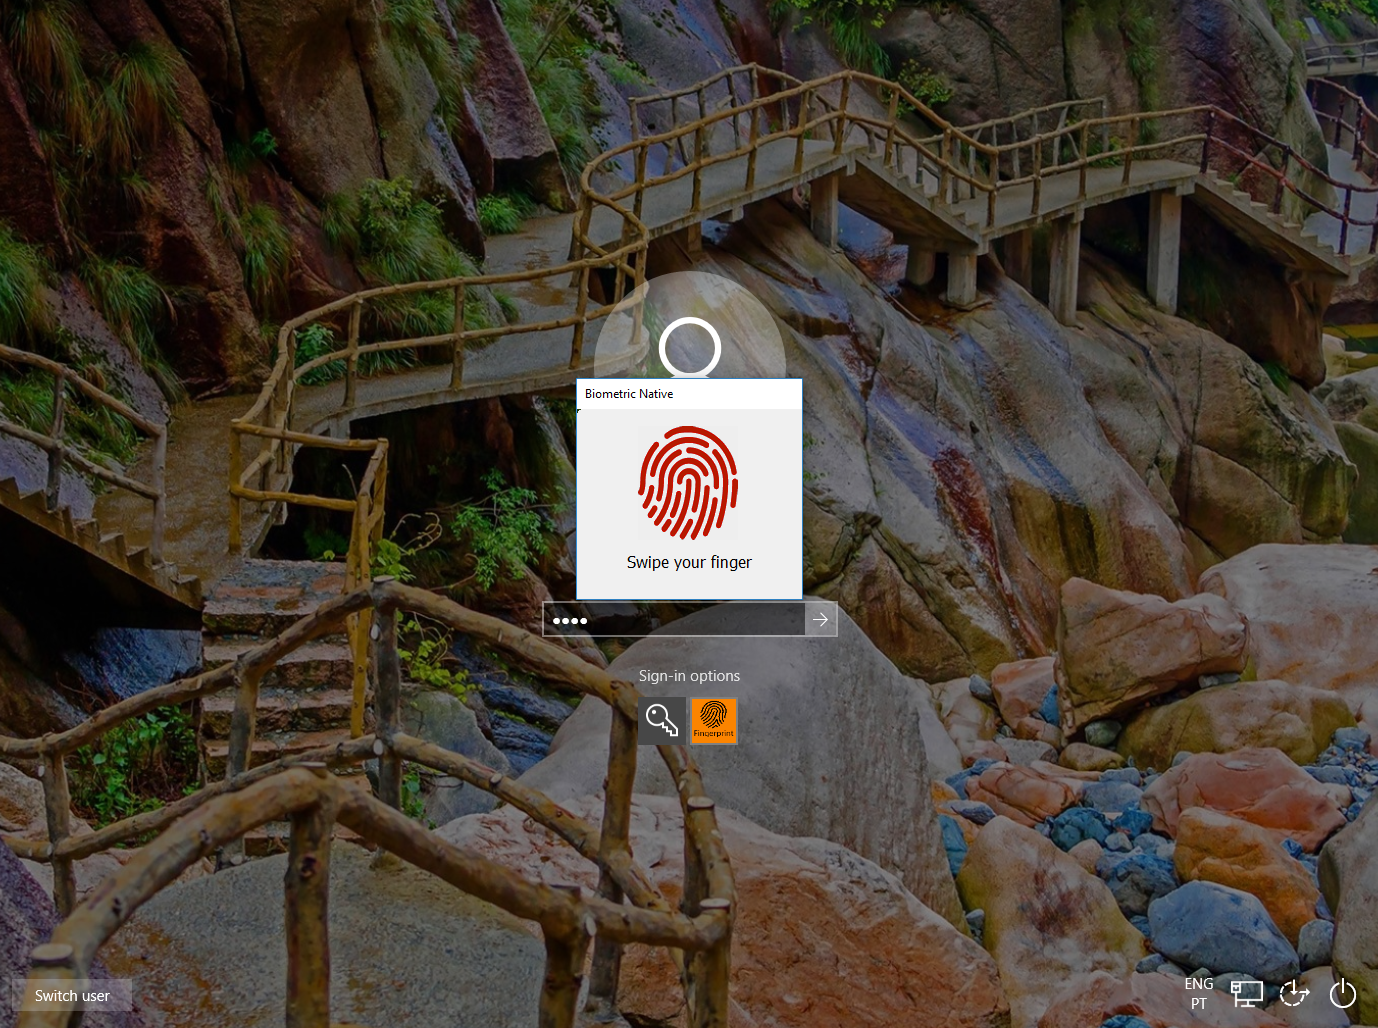
Authenticating
With all configurations done, go to the Windows login page and access using your registered fingerprint when prompted.
Configuration for Fujitsu PalmSecure-F Pro Biometric Reader
(This section is under construction / The Fujitsu PalmSecure-F Pro Biometric Reader is in Beta testing)
Configure Third Party Authentication PalmSecure
In AuthControl Sentry Management Console, add the following Third Party to Server > Third Party Authentication
Identifier: PalmSecureReader
Class: com.swiveltechnologies.pinsafe.server.thirdparty.FingerprintNitgen
Enabled: yes
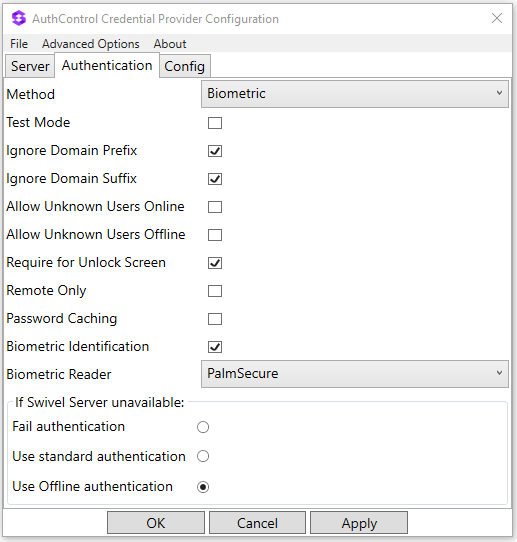
Configure Credential Provider PalmSecure
Select in Authentication -> Method the option "Biometric".
Select in Authentication -> Biometric Reader the option "PalmSecure".
Click Apply.
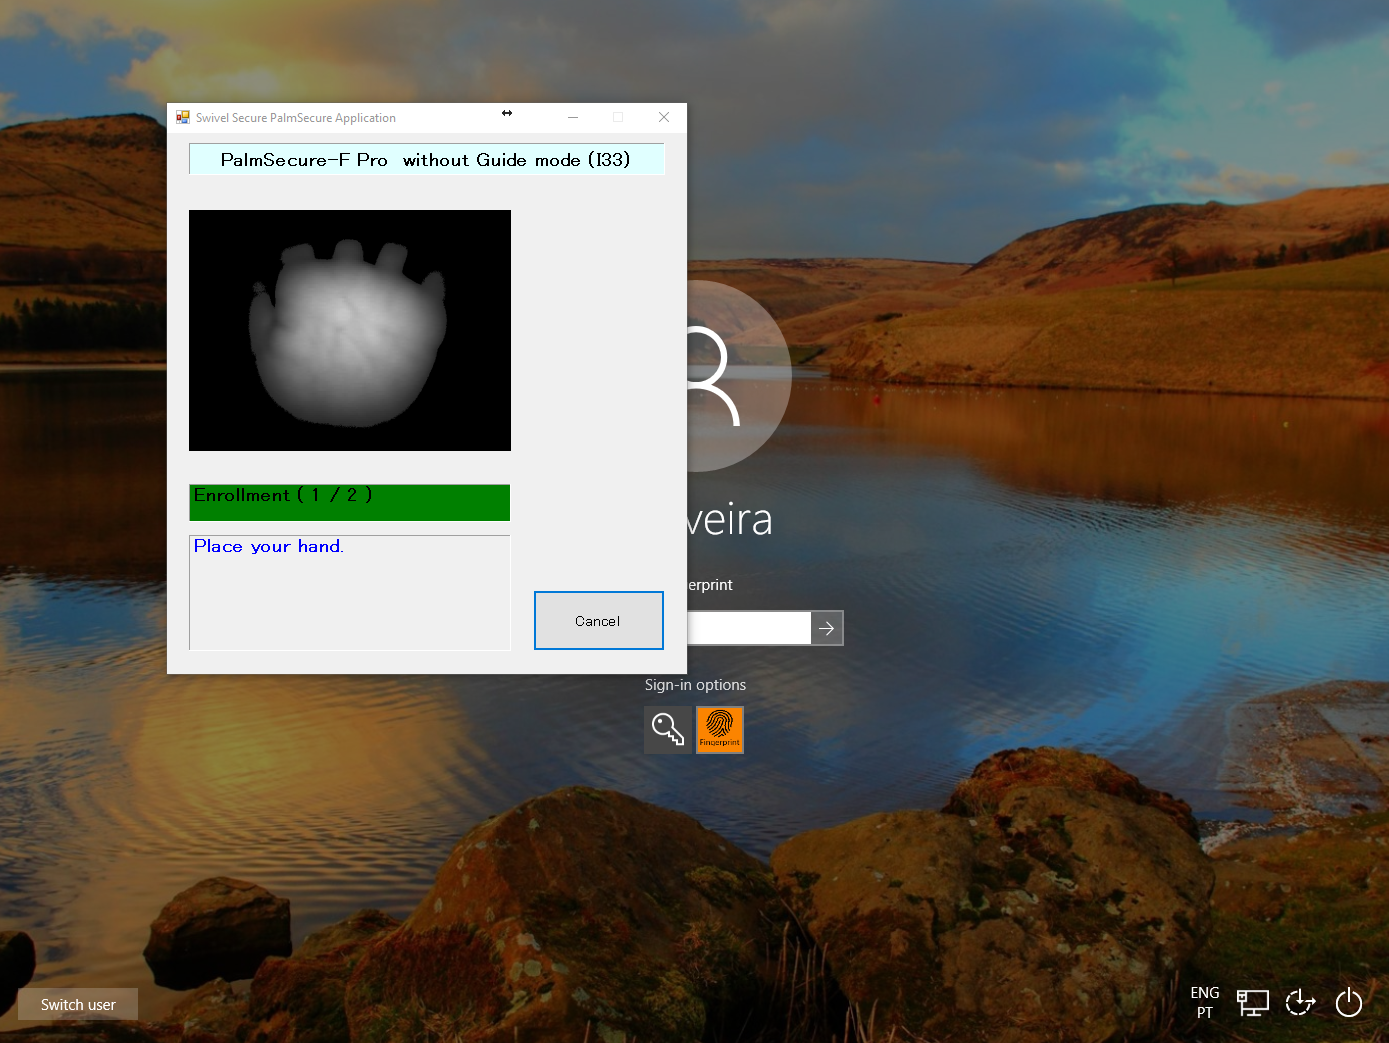
Enrolment with PalmSecure
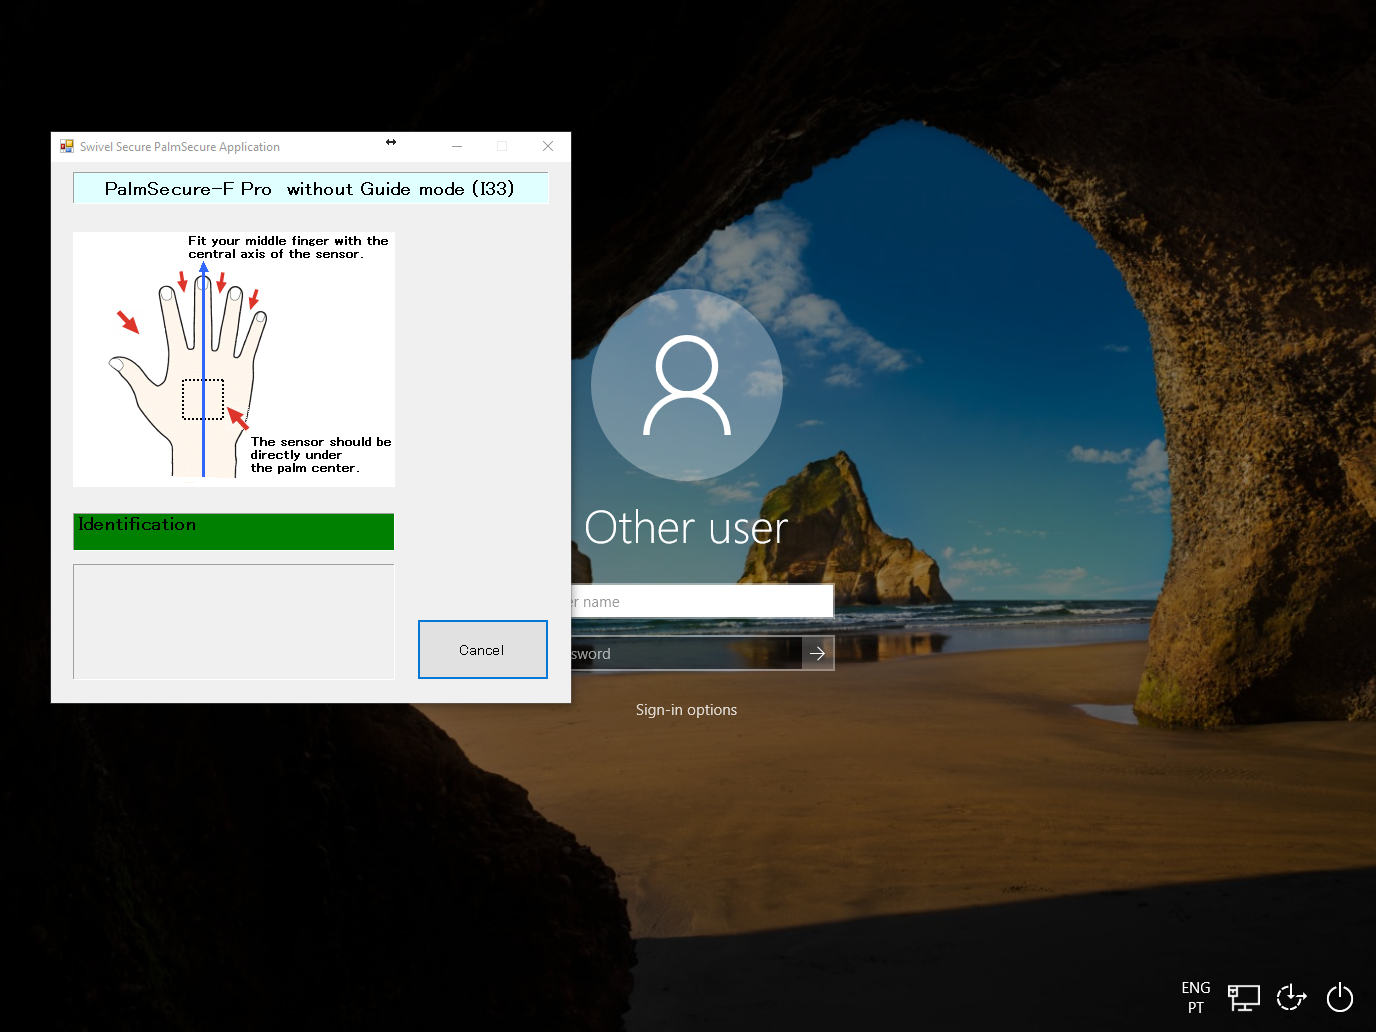
Authenticating with PalmSecure
Identification with PalmSecure
Biometric Identification
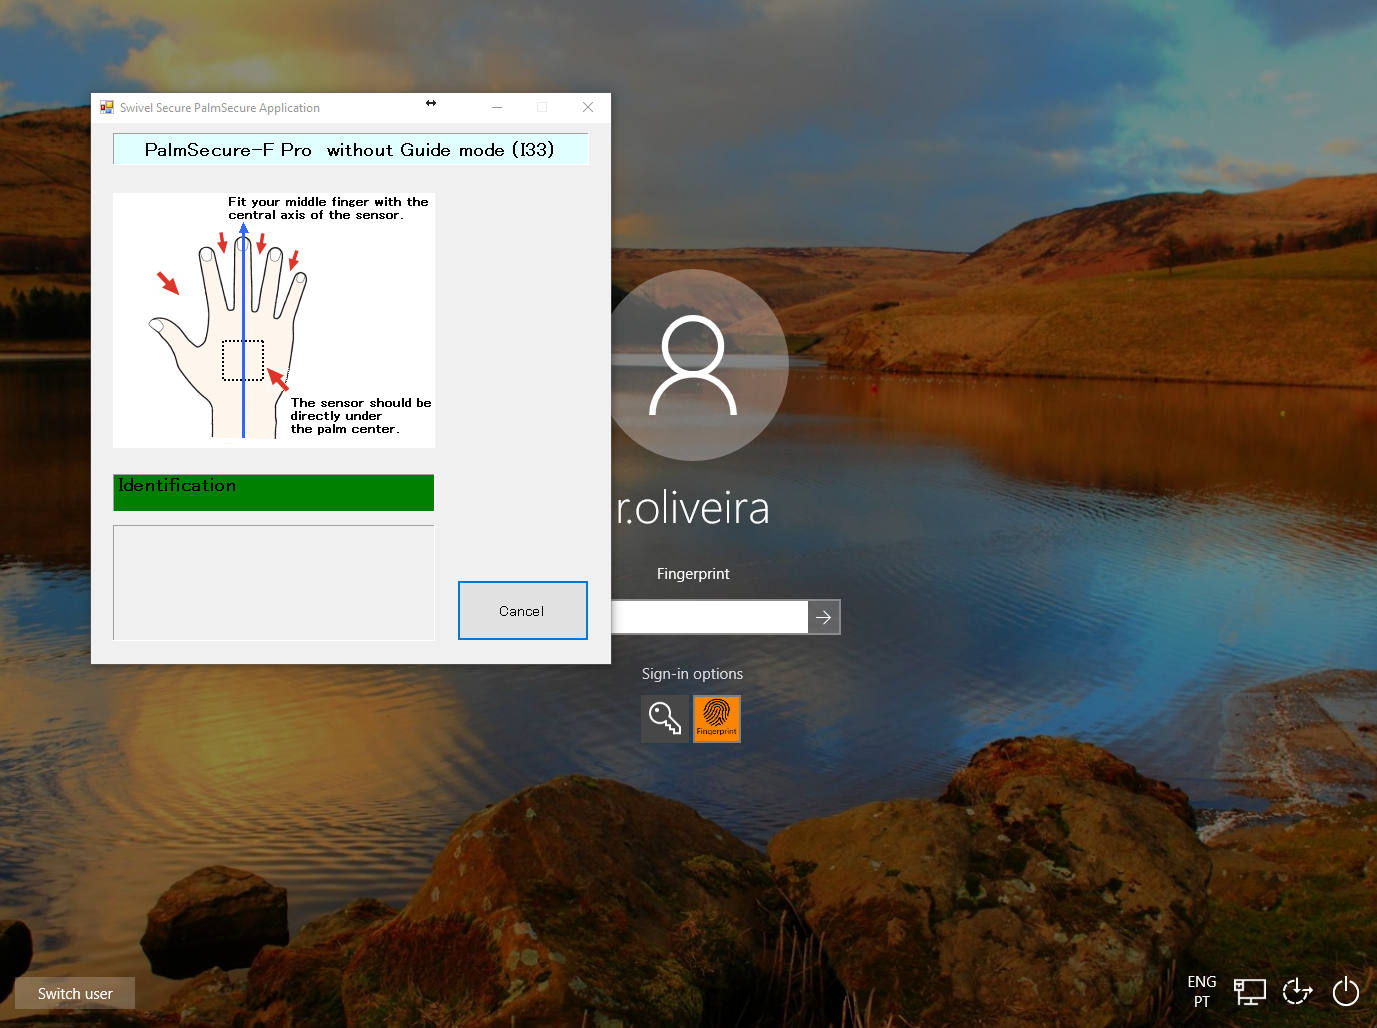
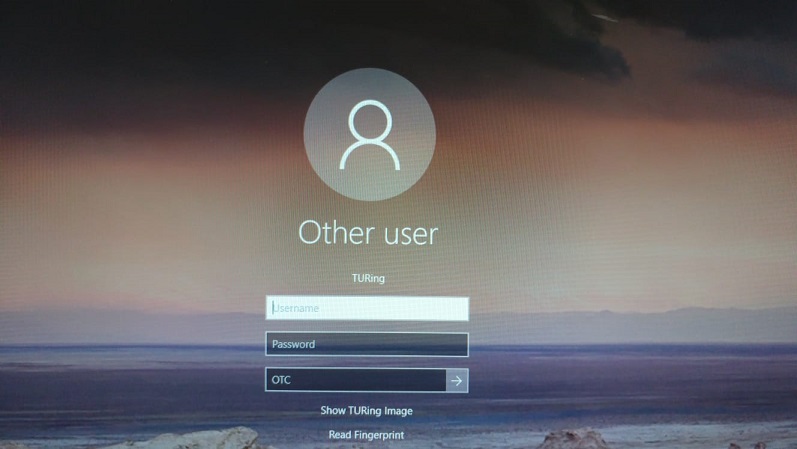
It's possible to use Biometric Identification instead of entering the username. First enable "Biometric Identification" under "Authentication" inside the Configuration.
When authenticating, select option "Read Fingerprint" and place your finger on the sensor when requested. If the fingerprint is enrolled, the username is automatically filled.
Removing user fingerprint
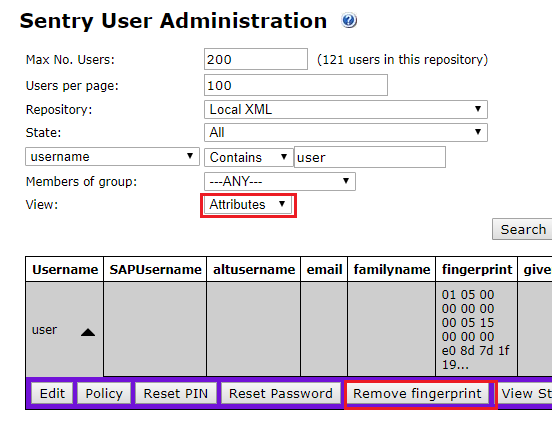
To remove a user fingerprint from the appliance, the administrator can go to User Administration, Select View -> Attributes, click the user and select "Remove fingerprint".
Troubleshoot
If you have issues with enrolment on the Integrated Laptop Reader, you might need to stop "Windows Biometric Service" or "WbioSrvc" under your Windows Services and then delete the files located at "WinBioDatabase" in C:\Windows\System32\WinBioDatabase.

