Difference between revisions of "Microsoft Office 365"
(→microsoft) |
m (1 revision imported) |
(No difference)
| |
Latest revision as of 12:52, 11 May 2017
Contents
- 1 Introduction
- 2 Prerequisites
- 3 Baseline
- 4 Architecture
- 5 Installation
- 6 Testing the Installation
- 7 Uninstalling the Swivel Integration
- 8 Troubleshooting
- 9 Known Issues and Limitations
- 10 Additional Information
- 11 Additional documentation
Introduction
This article describes how to manually integrate Swivel with Microsoft Office 365 to provide strong and two factor authentication. A more recent integration with a swivel installer and configuration program is available in the Microsoft ADFS 2 Integration. For ADFS version 3 see Microsoft ADFS 3 Authentication.
Video showing login to Office 365 using ADFS with PINpad
Swivel Authenticating Office365 using ADFS with PINpad from Swivel Secure.
Prerequisites
Swivel authentication platform 3.x
ADFS Proxy 2.0, ADFS Proxy 2.1
Microsoft Office 365
Downloads
Baseline
(The version tested with)
Swivel 3.9.5
ADFS Proxy 2.0, ADFS Proxy 2.1
Microsoft Office 365
Architecture
The process of the filter is quite simple and verifies the credentials against the Swivel server and, if correct, passes the user through to ADFS for issuing of the secure token. The filter plays no role in interpreting ADFS authentication requests or in generating responses.
Installation
Configure The Swivel Server
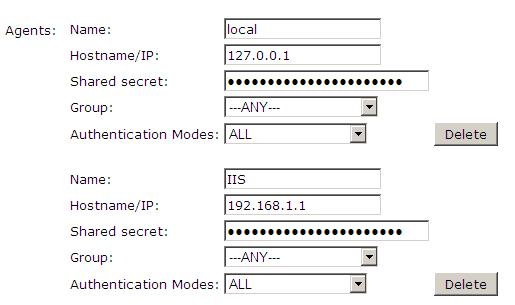
Configure a Swivel Agent (For standard XML Authentication)
1. On the Swivel Management Console select Server/Agent
2. Enter a name for the Agent
3. Enter the Exchange IP address
4. Enter the shared secret used above on the Exchange Filter
5. Click on Apply to save changes
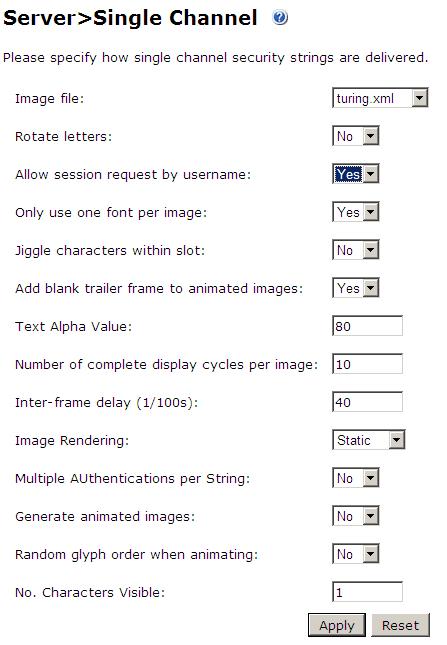
Configure Single Channel Access
1. On the Swivel Management Console select Server/Single Channel
2. Ensure ‘Allow session request by username’ is set to YES
Using additional attributes for authentication
When using additional attributes for authentication see User Attributes How To
ADFS Integration
The Swivel integration needs to be made on the internet facing ADFS proxy server that customers use for their OWA login.
The following files are used for integration
- FormsSignIn.aspx – example logon page
- Web.config – example configuration file
- Pinsafe_image.aspx – TURing image proxy web page
- Exists.aspx – utility web page to check if a user exists
- Bin\PINsafeASPNetFilter.dll – the PINsafe HTTP module that manages authentication
- Bin\PINsafeClient.dll – manages PINsafe communication
Copy required files to the ADFS server
Copy pinsafe_image.aspx and exists.aspx to the adfs\ls
Copy the PINsafeASPNetFilter.dll and PINsafeClient.dll to adfs\ls\bin (you may need to create this folder).
Modify the ADFS login pages
The other two files, FormsSignIn.aspx and web.config, are example files only. You should examine these files, and copy the relevant parts to your existing versions of these files, modifying them as appropriate. Instructions are included in the files themselves. Each section that needs to be changed or inserted is prefixed by and ended by .
web.config options
PINsafeServer default: 192.168.78.103, The IP address or hostname of the Swivel server.
PINsafePort default: 8080, The port used to communicate with the Swivel server. This usually should be 8080 for appliance and software installations.
PINsafeContext default: pinsafe, The Swivel application installation name, usually pinsafe.
PINsafeSecure default: True, On the PINsafePort if the Swivel server is using SSL communication this should be set to Yes, if no SSL is used this should be set to False.
PINsafeSecret default: secret, This needs to be set to the same as that set on the Swivel server Agent.
PINsafeLogonPath default: /adfs/ls/, the logon path to be used.
PINsafeLogoffPath default: /adfs/ls/, the logoff path to be used.
PINsafeExcludedPaths default: /adfs/ls/MasterPages/;./pinsafe_image.aspx, Add any custom paths that need to be accessed during authentication here.
PINsafeIgnoreDomain default: true, If True it will strip off the domain name to get the PINsafe username, if False it will not alter the user login name.
PINsafeAcceptSelfSigned default:True, If set to True it will allow self signed and invalid certificates to be used on the Swivel server. If set to False, the certificate must be correct for that of the Swivel server.
PINsafePassword default: True"
PINsafeImage default: True, If True Display a single Channel authentication image, if False do not display an image.
PINsafeMessage default: False, If True send the user an dual channel message, if False do not send the user a message.
PINsafeCookieSecret default: will be generated randomly.
PINsafeIdleTimeSecs default: 300
AllowNonPINsafeUsers default: False, If True allow non Swivel users to authenticate without Swivel authentication, if False do not permit non Swivel users to authenticate. the option to allow unknown users to authenticate without Swivel authentication only applies to users not known to Swivel at all. You cannot specify that it only applies to a group of users, and not to other users who are known to Swivel, but not in a particular group.
PINsafeFilterEnabled default: True, If true the Swivel ADFS filter is working, if False the Swivel ADFS filter is present but Swivel authentication is disabled.
PINsafeAuthenticationDomain default:
PINsafeUsernameField default: ctl00$ContentPlaceHolder1$UsernameTextBox
PINsafeOTCField default: otc, The prompt displayed to users where the Swivel authentication details should be entered.
Restart IIS
Restart IIS on the ADFS server for the changes to take effect.
Additional Installation Options
Disabling or enabling the Automated TURing
If login methods other than the TURing are to be used such as SMS, Mobile Client or Token, then the automated TURing must be disabled. This is for Swivel ADFS filter version 1.2.
Backup then edit the file C:\inetpub\adfs\FormsSignIn.aspx
Find the line with only showTuring(); and comment out using <!-- --> as below. To re-enable remove the comments.
     rowTuring.style.display = "";

   showTuring();

      {
to
     rowTuring.style.display = "";

   <!-- showTuring();  -->

   {
Reload the browser and verify that the login page is now correct.
Changing the Show TURing Button
After applying the Swivel customisation, go to C:\inetpub\adfs\ls and edit as an Administrator the FormsSignIn.aspx. Look for "Show TURing" and alter it as appropriate.
Testing the Installation
The next time you try to access the ADFS login page, there will be no apparent difference to the login page. However, after you enter the username, for an existing user, you should see an additional field for one-time code, and a button to request a TURing image. You should not be able to authenticate to ADFS without entering both the AD password AND the PINsafe one-time code.
Uninstalling the Swivel Integration
Troubleshooting
Check the Swivel logs
Check the ADFS server logs
Known Issues and Limitations
The ADFS proxy currently does not support a redirect if the user is required to Change their PIN.

