Difference between revisions of "Swivel Core V4 OATH Menu"
(→New OATH Token) |
(→Import OATH Tokens to database) |
||
| Line 63: | Line 63: | ||
== Import OATH Tokens to database == | == Import OATH Tokens to database == | ||
| − | [[File: | + | [[File: OATHImportTokens_1.png]] |
This screen allows you to import tokens from a file. | This screen allows you to import tokens from a file. | ||
Revision as of 11:48, 4 March 2020
Contents
[hide]OATH Policies
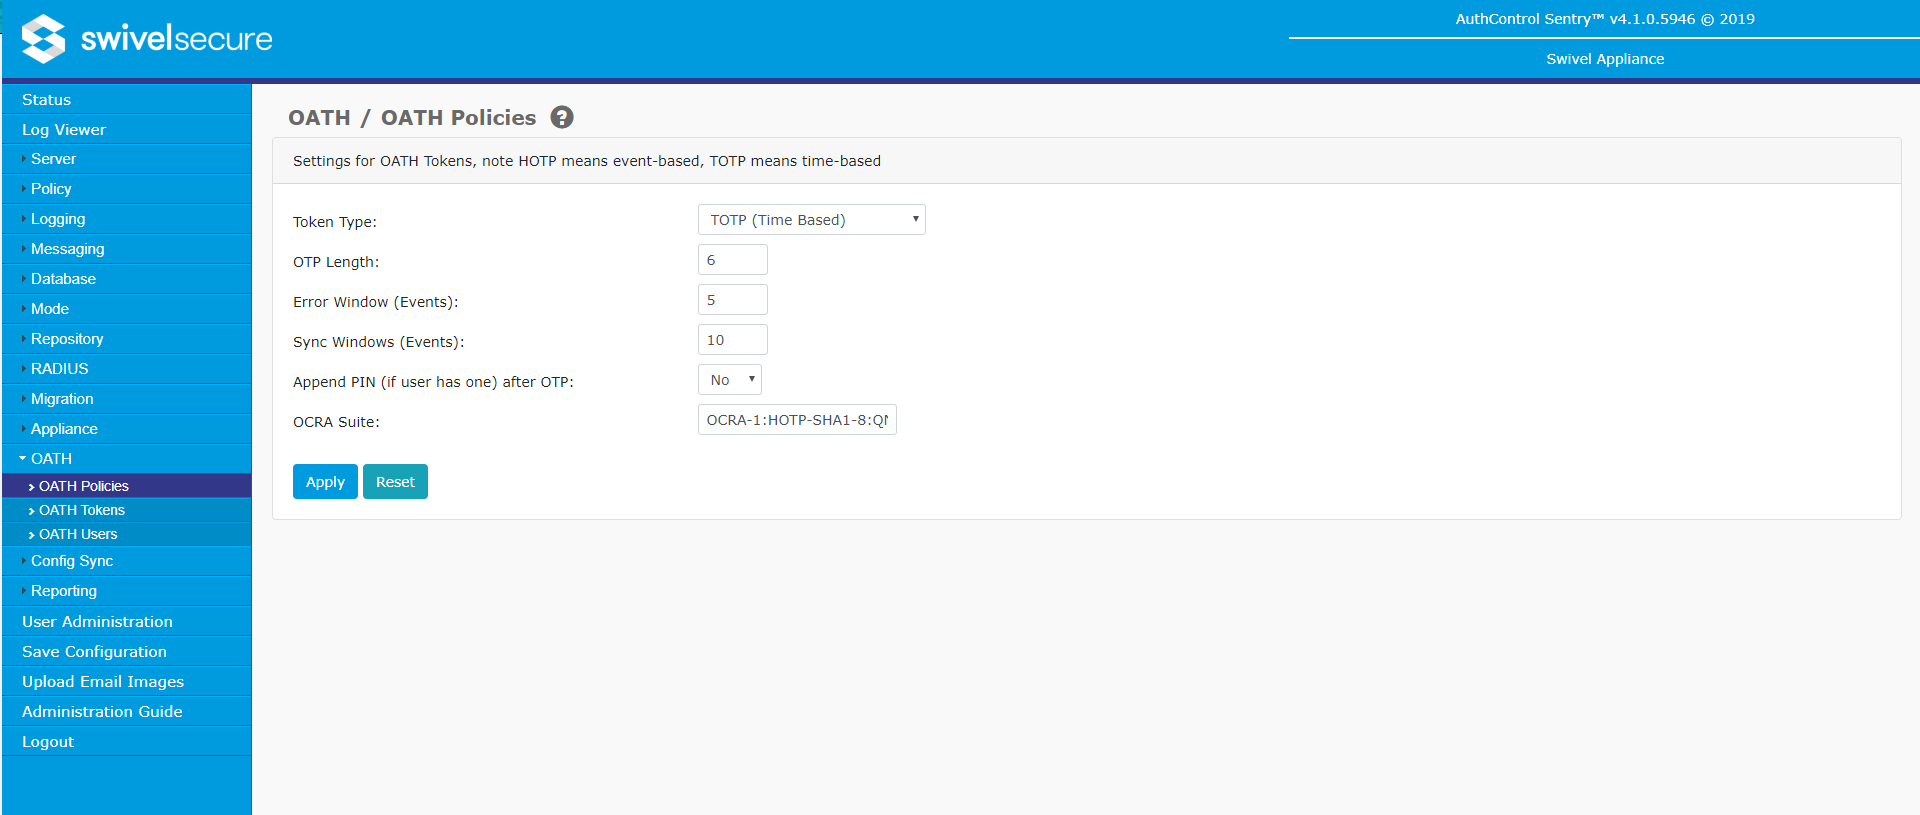
This screen allows you to configure token policies.
- Token type: Swivel supports two variations on Tokens. TOTP (that are time-based) and HOTP (that are event-based). A single installation can have a mixture of both token types. When tokens are created or imported this setting determines what kind of tokens they are.
- OTP Length: This define the length of OTP that the tokens support. Tokens supplied by Swivel will have six digits. If you choose to deploy different tokens, this setting will need to match the length of OTP displayed by the tokens.
- Error Window (Events): For event based tokens, users pressing the token button may cause the token to become out of sync with the server. Similarly for time-based tokens clock-drift may have the same effect. The error window allows the server to make allowances for this and will not only check the OTP for the expected event or time but will also check within an error window. So if the server is expecting the user to submit the OTP from event number 25 of their token but they submit the OTP for event number 27 if the Error Window is 2 or more this would be treated as a successful authentication and the token would be brought back into sync. For time based tokens each event is equivalent to 1 minute. So an error window of 2 would allow a clock drift of plus or minus one minute.
- Sync Window (Events):The Sync window allows tokens to be brought back into sync with the server. For example if the server is expecting the user to submit the OTP related to event 27 but the user submits the OTP associated with event 30. As this is outside the error window this would lead to a failed authentication. However if this was within the limit of the Sync Window the token would be resynced to the new value and therefore the next authentication attempt should succeed.
- Append PIN (if user has one) after OTP: If required you can require the user to append their PIN after their token OTP. This mitigates the risks of token loss.
- OCRA Suite: Swivel Supports OCRA (Oath Challenge Response Algorithm). This is where a challenge is used along with the token seed and event number (or time) the create a OTP. Swivel can supply OCRA tokens that confirm to. By default is set to OCRA-1:HOTP-SHA1-8:QN08-T1M. However the platform can support other OCRA suites.
OATH Tokens
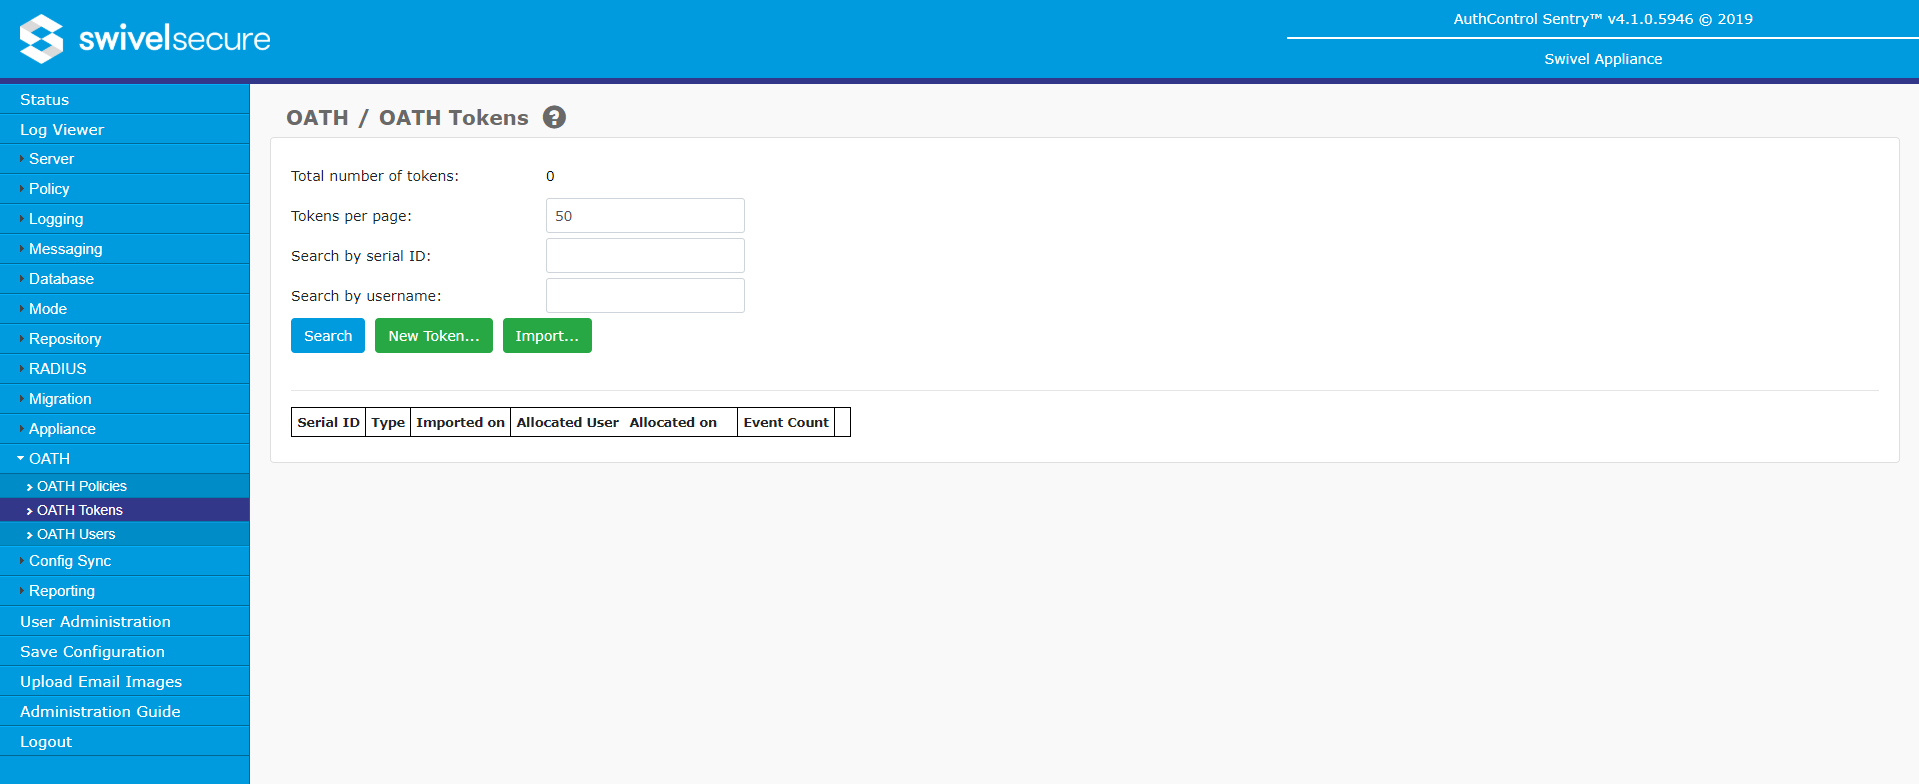
This screen allows you to assign users to tokens that have been synced into the Swivel database. Search functionality enables you to filter the list by username or token serial ID. You can resynchronise the token count for those tokens and you can insert new tokens.
- Search: Allows you to filter the tokens by serial ID and/or username.
- Tokens per page: Allows you to specify the number of tokens displayed per page.
- Search by serial ID: Returns the tokens which contain the specified value in the serial ID.
- Search by username: Returns the tokens which contain the specified value in the username of the user assigned to the token.
- New Token: Allows you to create a new token. When you click the button, a new screen appears that presents a form to introduce the data needed to create a new token.
- Import: Allows you to import tokens through a file. When you click the button, a new screen appears that allows you select the file to import.
- Assign User: This button appears when the token has a user allocated. When you click the button, a new screen appears that presents a list of unallocated users that are members of a group with the OATH privilege for you to select from.
- Un-assign: When a token has a user allocated, this button appears in the corresponding row. Also allows you to un-assign the current token's user.
- Re-sync: Allows you to resynchronise the current token. When you click the button, a new screen appears that presents two 'One Time Password' fields. Enter a One Time Password from the token in the first field, retrieve the next One Time Password from the Token and enter this into the second field. Press OK to re-sync the token.
- Delete: Allows you to delete the current token.
OATH Assign User
This screen shows users that are members of a group with the OATH privilege which do not currently have a token assigned. It allows you to assign a user to a token and search users by username.
- Search: Allows you to filter the users by username.
- Users per page: Allows you to specify the number of users displayed per page.
- Search by username: Returns the usernames containing the specified value.
- Select: Assigns the user to the current token and returns to the OATH Tokens screen.
Sync Token With Server
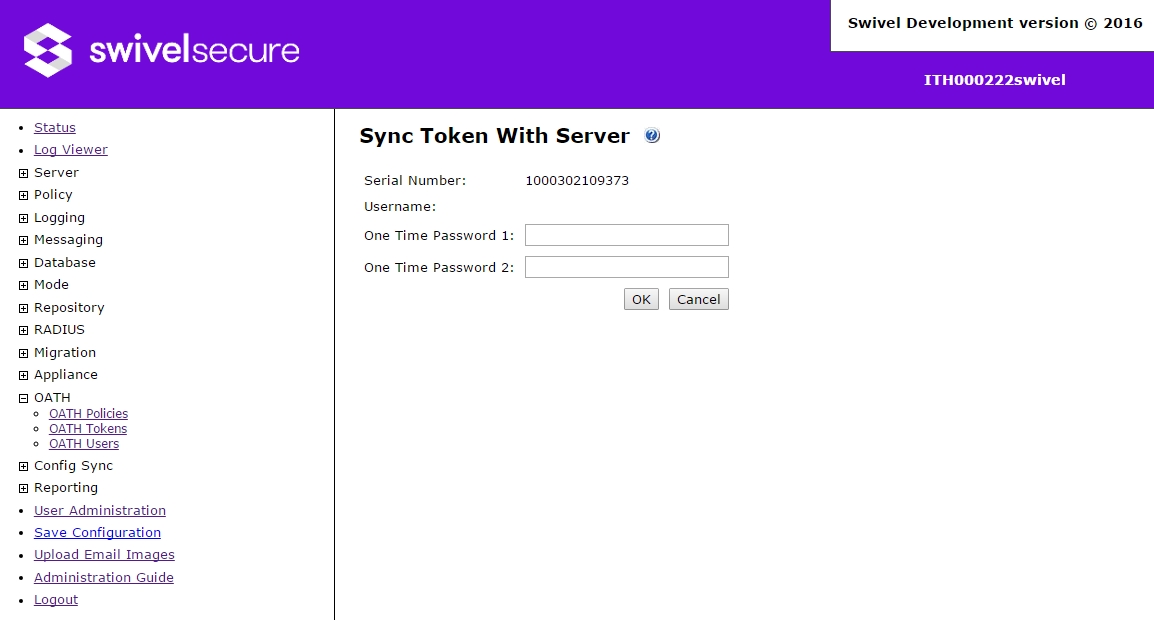
This screen presents two 'One Time Password' fields. Enter a One Time Password from the token in the first field, retrieve the next One Time Password from the Token and enter this into the second field. Press OK to re-sync the token.
- Serial Number: Specify the serial number of the token to resynchronise.
- Username: Specify the username of the allocated user. It will be empty if the token doesn't have a allocated user.
- One Time Password 1: Allows you to specify the first One Time Password.
- One Time Password 2: Allows you to specify the second One Time Password.
New OATH Token
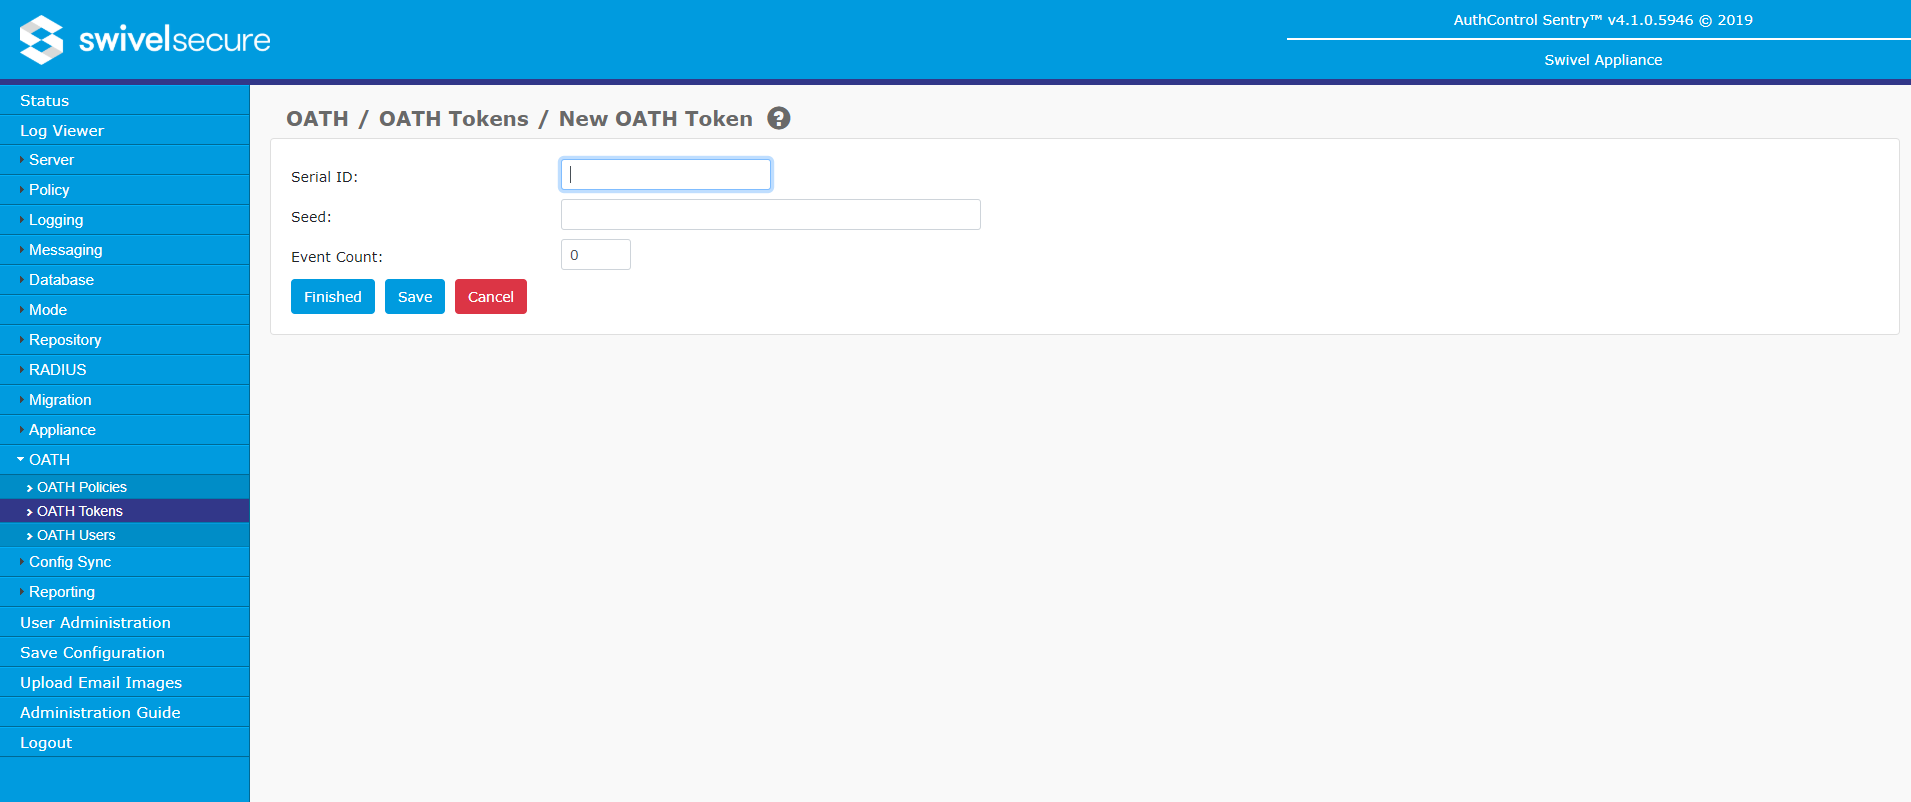
This screen allows you to create a new Token.
- Serial ID: Allows you to specify the Serial ID.
- Seed: Allows you to specify the seed.
- Event Count: Allows you to specify the event count.
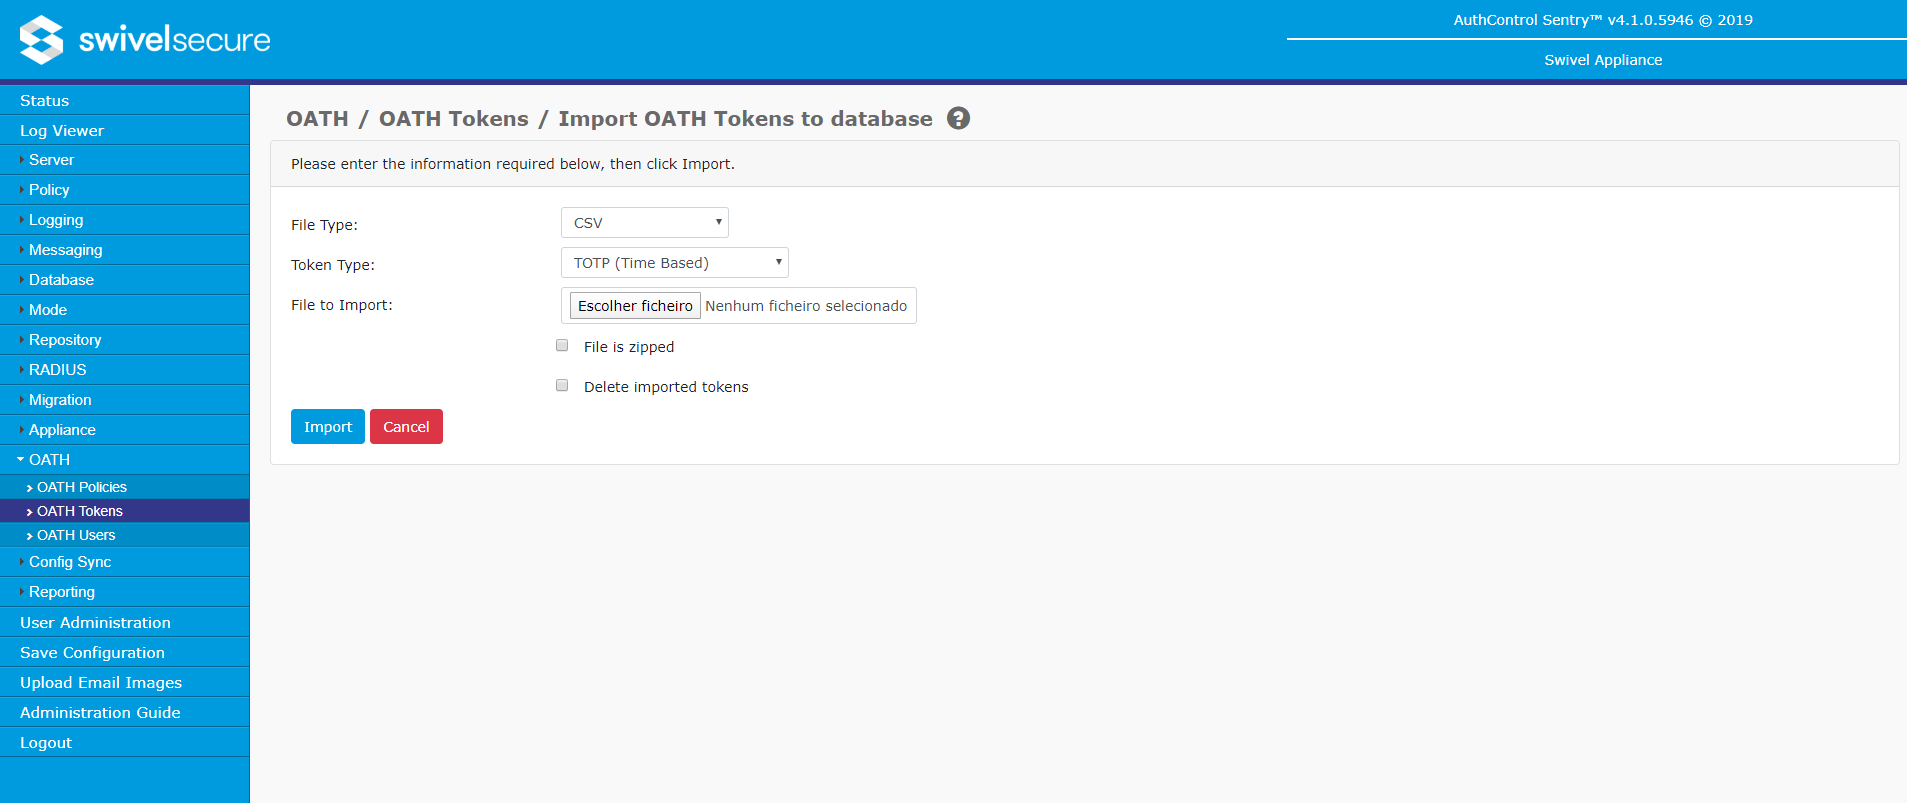
Import OATH Tokens to database
This screen allows you to import tokens from a file.
- File Type: Allows you to specify the file type.
- File is zipped: Allows you to specify if the file is zipped.
- Delete imported tokens: If this option is set to "Yes" when importing a list of tokens, then instead of adding any new tokens it finds from the list, it will delete any existing tokens it finds. This is a quick way to remove several tokens at once.
- Browse: Allows you to select the file that contains the tokens.
- Import: Allows you to import the tokens from the specified file.
- Cancel: Allows you to close the current screen and returns to the Tokens screen.
NOTE: The type of the tokens imported will be the one specified on OATH Policies screen. Please ensure that the type is correct before importing new tokens.
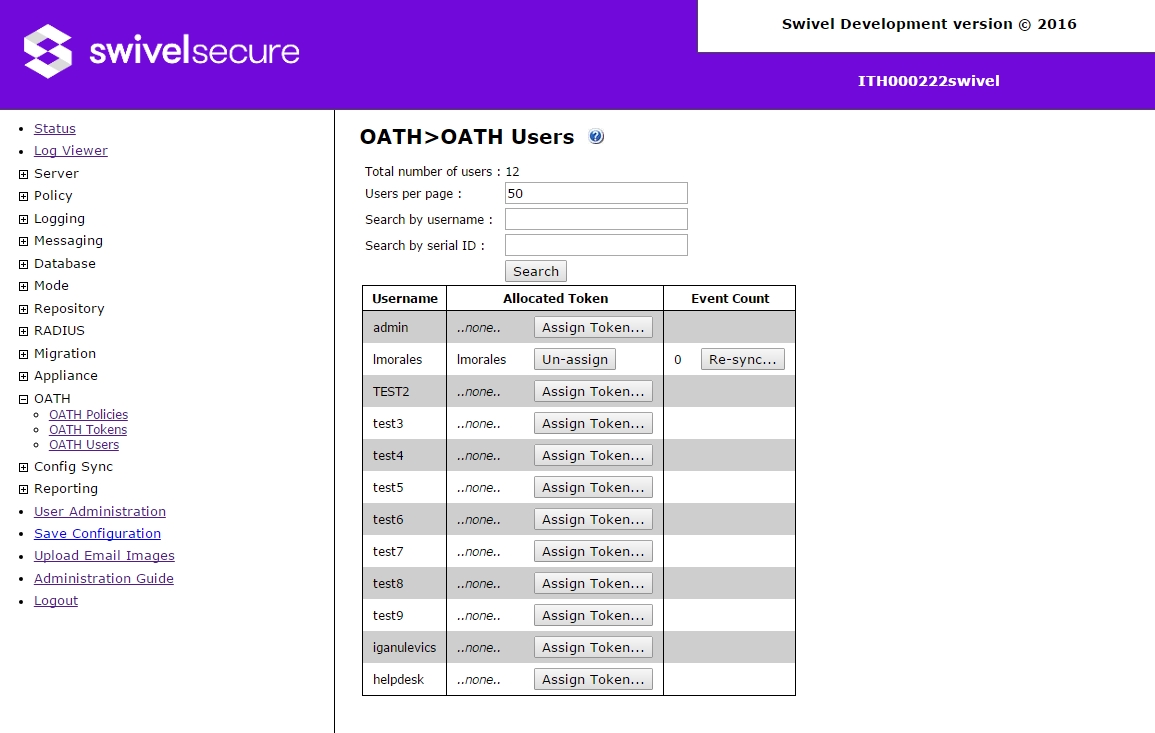
OATH Users
This screen allows you to assign tokens to users that have been synced into the Swivel database. Search functionality enables you to filter the list by username or token serial ID. You can resynchronise the token count for those tokens that are assigned to users.
- Search: Allows you to filter the tokens by serial ID and/or username.
- Tokens per page: Allows you to specify the number of tokens displayed per page.
- Search by serial ID: Returns the tokens which contain the specified value in the serial ID.
- Search by username: Returns the tokens which contain the specified value in the username of the user assigned to the token.
- Assign Token: This button appears against tokens that are unallocated and it allows you to assign a token to a user. When you click the button, a new screen appears that presents a list of unallocated token Serial IDs for you to select from.
- Un-assign: When a user has a token allocated, this button appears in the corresponding row. Also allows you to un-assign the current token's user.
- Re-sync: This button appears against tokens that are allocated to a user and it allows you to resynchronise the current user's token. When you click the button, a new screen appears that presents two 'One Time Password' fields. Enter a One Time Password from the token in the first field, retrieve the next One Time Password from the Token and enter this into the second field. Press OK to re-sync the token.
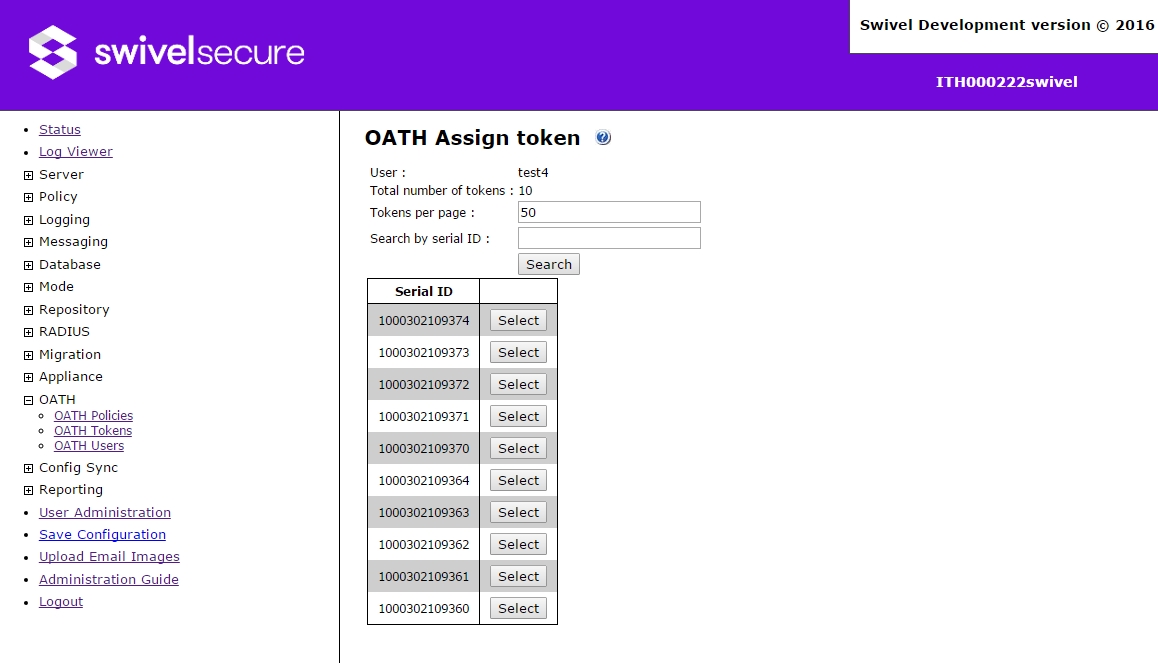
OATH Assign Token
This screen allows you to assign a token to a user and search tokens by serial ID. It only displays tokens which have not been allocated to a user.
- Search: Allows you to filter the tokens by serial ID.
- Tokens per page: Allows you to specify the number of tokens displayed per page.
- Search by serial ID: Returns the tokens which contain the specified value in the serial ID.
- Select: Assigns the token to the current user and returns to the OATH Users screen.
