Salesforce.com
Contents
Introduction
This document covers the integration of Swivel with Salesforce.com.
Prerequisites
Salesforce.com Adminisrative Account
Swivel virtual or hardware appliance or server
PINsafe salesforce software Download and unzip the salesforce.war file
The Swivel server needs to be accessible accross the internet for the Salesforce.com server to connect, and the IDP is usually deployed so that it can also be access from the Internet. For security using a Swivel hardware or virtual appliance, the IDP is usually deployed in /webapps2 and accessible on port 8443 (or using a PAT on the appliance using 443)
Baseline
Salesforce 11, 12
Swivel 3.8, 3.9
Architecture
Salesforce.com users authenticate using SAM-L authentication against Swivel
Installation
Salesforce.com Configuration
Allow Authentication
Contact Salesforce.com to enable Federated SSO
Configure Single Sign On
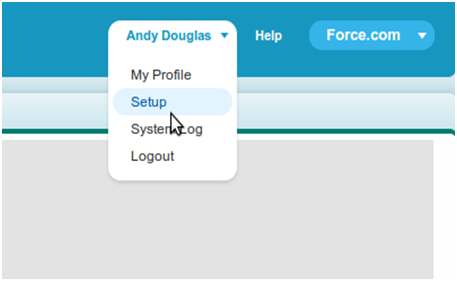
Using an administrative user logon to Salesforce.com and select 'Setup' from the top right button with the the user name on.
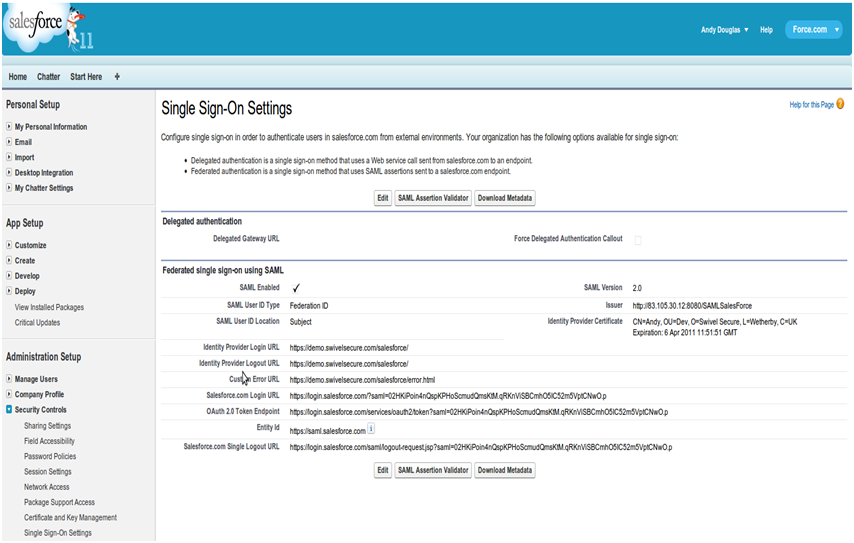
Each version of Salesforce is slightly different but each should have a screen similar to the below reached from Setup->Administrative Setup->Security Controls->Single Sign-On Settings
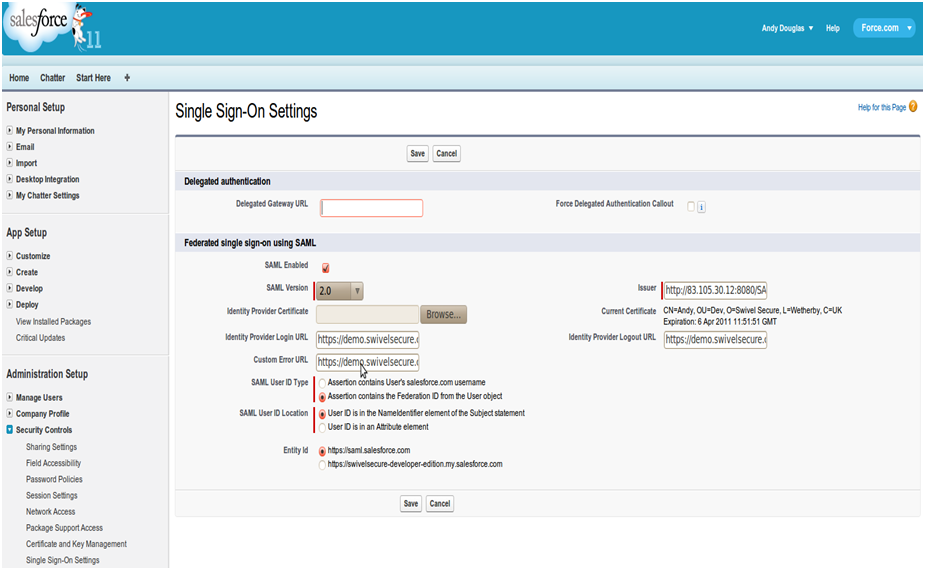
Click on Edit. At this point you should get something similar to the screen below:
a) upload the certificate and set the issuer
b) set the login URL and logout URL to point to the instance of salesforce-pinsafe you will have running (pointing to the instance is fine as it will re-direct to the logon page automatically)
c) set the remaining settings as above
Entity ID The issuer in SAML requests generated by Salesforce, and is also the expected audience of any inbound SAML Responses. If you don’t have domains deployed, this value is always Entity ID https://saml.salesforce.com. If you have domains deployed, Salesforce recommends that you use your custom domain name.
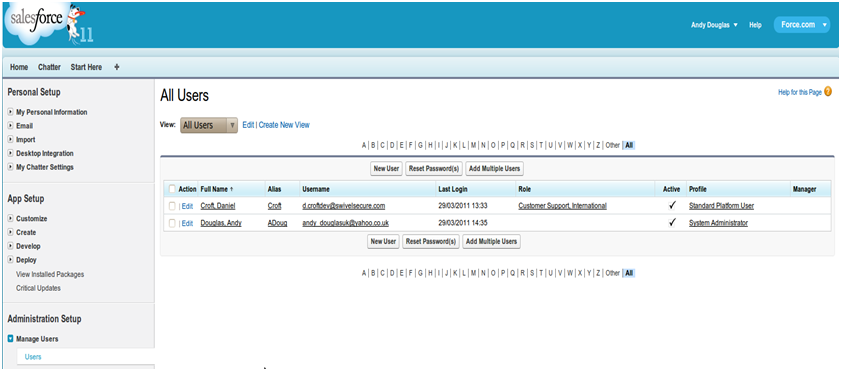
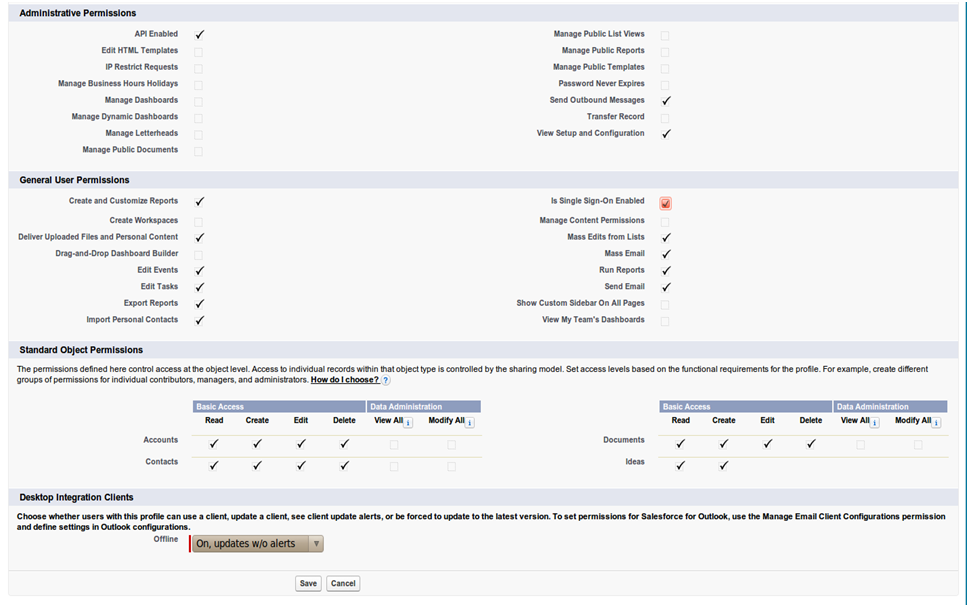
Ensure the users that you wish to use SSO are using a profile that has SSO enabled. Click Manage Users->Users. The profile assigned to each user is on the right hand side.
Click on the profile and find the SSO option as shown below, ensure it is enabled. If it isn't then click edit and enable it.
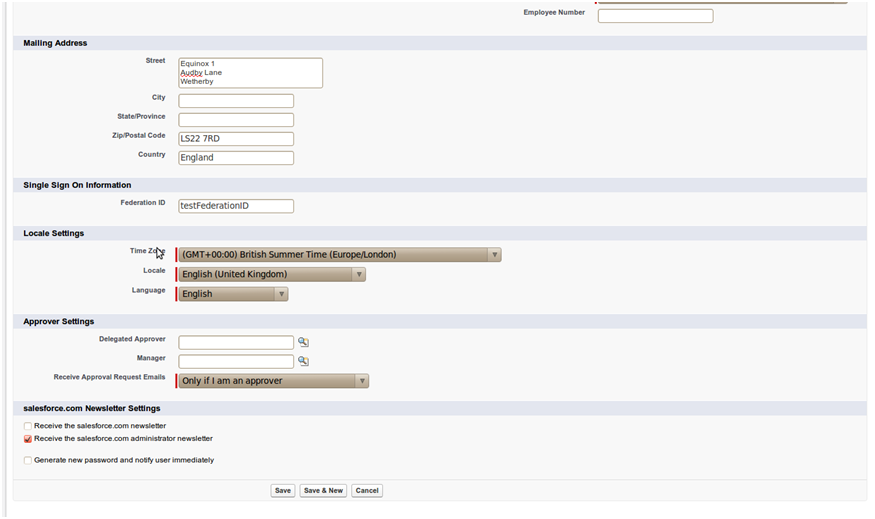
Ensure the users have a Federation ID which will map to their Swivel username. Click Manage Users->Users, select a user then enter the Federation ID
Configure The Swivel Server
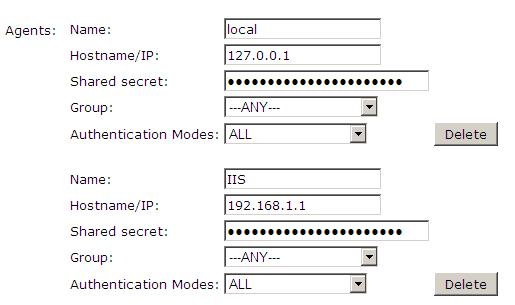
Configure a Swivel Agent (For standard XML Authentication)
1. On the Swivel Management Console select Server/Agent
2. Enter a name for the Agent
3. Enter the IP address or hostname for the server where the salesforce.war is installed, if installed on the same server as the Swivel server use 127.0.0.1 or localhost, a default entry may already exist for this
4. Enter the shared secret to be used above on the below server configuration.
5. Click on Apply to save changes
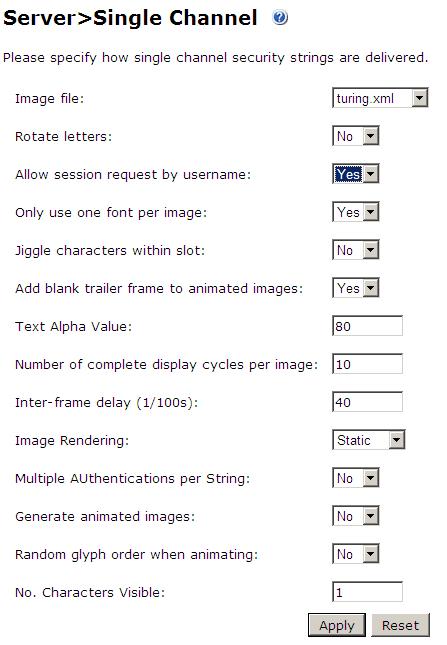
Configure Single Channel Access
1. On the Swivel Management Console select Server/Single Channel
2. Ensure ‘Allow session request by username’ is set to YES
Access Device or Application Integration
Client Side Installation
1.The SAML-salesforce war (salesforce.war) should be placed near a Swivel installation on a webserver. This could be a Swivel virtual or hardware appliance. On a Swivel virtual or hardware appliance this would need to be copied to the /usr/local/tomcat/webapps2 folder.
2.Inside the saleforce war exists a properties file (WEB-INF->settings.xml). Initially this will look something like:
  <?xml version="1.0" encoding="UTF-8"?>
  <!DOCTYPE properties SYSTEM "http://java.sun.com/dtd/properties.dtd">
  <properties>
  <entry key="ssl">false</entry>
  <entry key="server">localhost</entry>
  <entry key="port">8080</entry>
  <entry key="context">pinsafe</entry>
  <entry key="imagessl">true</entry>
  <entry key="imageserver">demo.swivelsecure.com</entry>
  <entry key="imagecontext">proxy</entry>
  <entry key="imageport">8443</entry>
  <entry key="secret">secret</entry>
  <entry key="selfsigned">true</entry>
  <entry key="salesforceURL">https://login.salesforce.com/?saml=02HKiPoin4nQspKPHoScmudQmsKtM.qRKnViSBCmhO5IC52m5VptCNwO.p</entry>
  <entry key="audience">https://saml.salesforce.com</entry>
  <entry key="certificateIssuer">http://83.105.30.12:8080/SAMLSalesForce</entry>
  <entry key="publicKeyFilePath">./keys/pinsafe/ssl/dsapubkey.der</entry>
  <entry key="privateKeyFilePath">./keys/pinsafe/ssl/dsaprivkey.der</entry>
  <entry key="certificate">./keys/pinsafe/ssl/dsacert.pem</entry>
  </properties>
These settings should be changed to match, additional field values may need to be created as above:
- The settings for the local Swivel server
For a Swivel virtual or hardware appliance the settings may be:
  <entry key="ssl">false</entry>
  <entry key="server">localhost</entry>
  <entry key="context">pinsafe</entry>
  <entry key="port">8181</entry>
  <entry key="imagessl">true</entry>
  <entry key="imageserver">demo.swivelsecure.com</entry>
  <entry key="imagecontext">proxy</entry>
  <entry key="imageport">8443</entry>
  <entry key="secret">secret</entry>
  <entry key="selfsigned">true</entry>
For a Swivel software install the settings may be:
  <entry key="ssl">false</entry>
  <entry key="server">localhost</entry>
  <entry key="context">pinsafe</entry>
  <entry key="port">8080</entry>
  <entry key="imagessl">false</entry>
  <entry key="imageserver">demo.swivelsecure.com</entry>
  <entry key="imagecontext">pinsafe</entry>
  <entry key="imageport">8080</entry>
  <entry key="secret">secret</entry>
  <entry key="selfsigned">true</entry>
- The settings as per the salesforce setup (Setup->Administrative Setup->Security Controls->Single Sign-On Settings)
- The location of the keys (which must match the certificate installed in salesforce)
  <entry key="publicKeyFilePath">./keys/pinsafe/ssl/dsapubkey.der</entry>
  <entry key="privateKeyFilePath">./keys/pinsafe/ssl/dsaprivkey.der</entry>
Key and Certificate Generation
see Key and Certificate Generation
Additional Installation Options
Verifying the Installation
In a browser, go to the root URL for the saml-salesforce client. This will redirect to the logon page. Logging in as a user will send a saml assertion for the username you logged in as. If this username matches to a FederationID for a user in Saleforce (see above) then you will be logged in as that user
