Netgear
Introduction
This article explains how to integrate the Netgear SSL VPN product set with PINsafe. This article has been created based on the Netgear FVS336G v2 Product. It is assumed that other products that support Banner Text in the same way (such as the SRX5308) can be integrated in the same way. The Netgear FVS336G v2 Product allows a proxy to be created to PINsafe by creating access through a firewall rule.
Note that a firmware upgrade maybe required to support this integration.
Baseline
This integration is based on FVS336G v2, Firmware 3.0.7-13 and 3.0.7-24 with PINsafe Version 3.8
PINsafe configuration
Configuring the RADIUS server
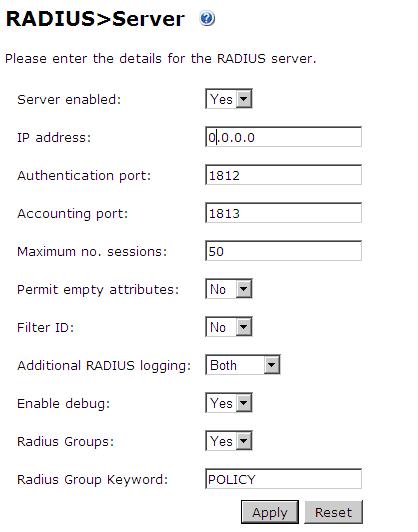
Configure the RADIUS settings using the RADIUS configuration page in the PINsafe Administration console. In this example (see diagram below) the RADIUS Mode is set to ‘Enabled’ and the HOST IP (the PINsafe server) is set to 0.0.0.0. (leaving the field empty has the same result). This means that the server will answer all RADIUS requests received by the server regardless of the IP address that they were sent to.
Note: for virtual or hardware appliances, the Swivel VIP should not be used as the server IP address, see VIP on PINsafe Appliances
Setting up the RADIUS NAS
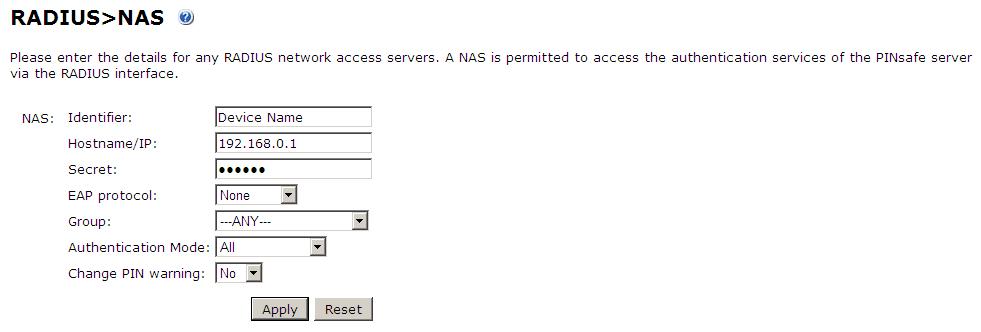
Set up the NAS using the Network Access Servers page in the PINsafe Administration console. Enter a name for the Netgear SSL VPN server server. The IP address has been set to the IP of the Netgear SSL VPN server, and the secret ‘secret’ assigned that will be used on both the PINsafe server and Netgear SSL VPN configuration.
You can specify an EAP protocol if required, others CHAP, PAP and MSCHAP will be supported. All users will be able to authenticate via this NAS unless to restrict authentication to a specific repository group.
Enabling Session creation with username
The PINsafe server can be configured to return an image stream containing a TURing image by presenting the username via the XML API or the SCImage servlet.
Go to the ‘Single Channel’ Admin page and set ‘Allow Session creation with Username:’ to YES.
To test your configuration you can use the following URL using a valid PINsafe username:
Virtual or hardware appliance
https://PINsafe_server_IP:8443/proxy/SCImage?username=testuser
For a software only install see Software Only Installation
For further information see Single Channel How To Guide
Setting up PINsafe Dual Channel Transports
Netgear Configuration
Configuring the Domain
To create a portal whereby users have to use PINsafe in order to authenticate, you need to configure a domain on the Netgear SSL VPN.
To do this go to the Users -> Domain page and create a new Domain.
For this Domain, set it to use RADIUS PAP and enter the IP address of the PINsafe server and set the shared secret. Then set the domain to use the Portal pages created previously.
On the PINsafe server ensure that the RADIUS server is enabled and create a NAS entry for the Netgear SSL VPN.
Now when a user goes to the login page they can select the PINsafe domain created.
The credentials they submit will be submitted to PINsafe via RADIUS and if correct access will be granted.
Single Channel TURing Integration
This is not required where dual channel authentication through SMS, Mobile Client is used.
Create a Firewall Access Rule
Create a rule to allow traffic from the WAN to the Swivel virtual or hardware appliance. The Netgear device will proxy the request. Since this will open up a port to PINsafe from the WAN, it is recommended to use a Swivel virtual or hardware appliance with its proxy port protection on port 8443, and/or configure an IP filter to prevent access to the administration console. See Filter IP How to Guide On the Netgear Prosafe Administration Console select Security/Firewall/LAN WAN Rules then below Inbound Services click on the add button and create a rule to allow traffic with the following settings:
Service Name: HTTP (You may need to create a port for 8080 or 8443)
Action/Filter: Allow Always
LAN Server IP Address: PINsafe server IP address
LAN Users:
WAN Users: ANY
Destination WAN1
Bandwidth Profile: None
An entry should appear in the Inbound Services
Modify the Login Page
This section explains how to modify the SSL Login page to include a TURing image. Note that the banner text is limited to 256 Characters, the example shown is approx 250 characters, so no additions should be made and using a long pinsafe host name may cause issues
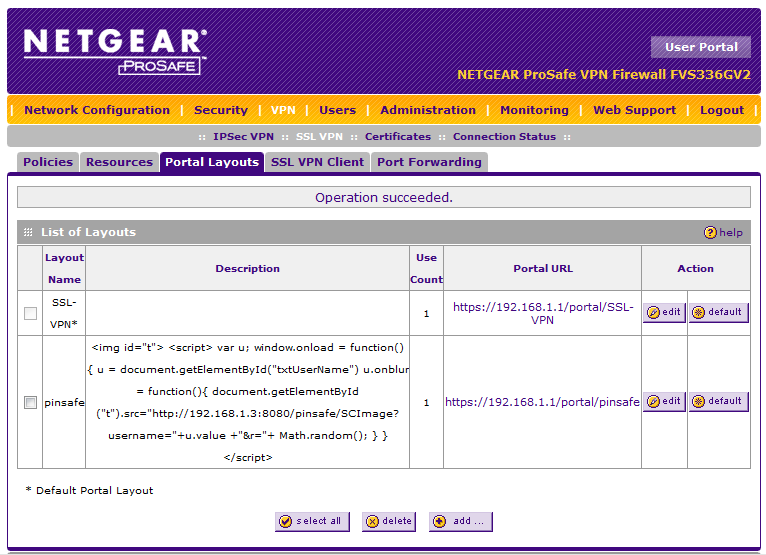
To create the PINsafe login page go to the VPN -> SSL VPN -> Portal Layouts and create a new portal layout.
In the Banner Text section of the portal layout page, enter the following text
<img id="t">
<script>
var u;
window.onload = function(){
u = document.getElementById("txtUserName");
u.onblur = function(){
document.getElementById("t").src="http://192.168.1.3:8080/pinsafe/SCImage?username="+u.value +"&r="+Math.random();
}
}
</script>
Replacing 192.168.1.3 with the IP address of you PINsafe server. Note that there is a maximum of 256 characters allowed for this so if you PINsafe hostname is long, you may need to removed the "&r="+Math.random() text to compensate.
Also note if you are integrating with a virtual or hardware appliance the format will be https on port 8443, and it will be /proxy instead of /pinsafe
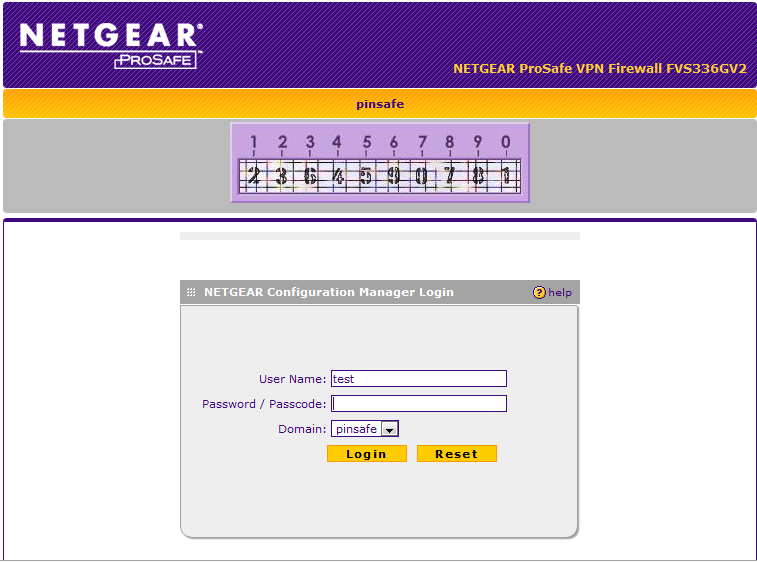
Once this portal page is complete you can test that the image is being included correctly by navigating to the login page, in this example https://192.168.1.1/portal/pinsafe.
A similar modification can be completed to request a dual channel image (replace SCImage with DCMessage) or request the index of the security string to be used (replace SCImage with DCIndexImage)
The image should appear when you tab away from the username field.
Additional Configuration Options
The login can be configured to use AD by using Check Password with Repository on PINsafe. The user would enter the AD password followed by the One time Code, example: ADPasswordOTC password9573. Use of this requires PAP authentication.
See Password_How_to_Guide#Check_password_with_repository
Known issues
The length of text within the banner may vary between versions, a slightly shorter version of the text without the random number to ensure the image is not cached is given below:
<img id="t">
<script>
var u;
window.onload = function(){
u = document.getElementById("txtUserName")
u.onblur = function(){
document.getElementById("t").src="http://192.168.1.3:8080/pinsafe/SCImage?username="+u.value;
}
}
</script>


