Difference between revisions of "Microsoft OWA 2003 IIS Integration"
m (1 revision imported) |
|
(No difference)
| |
Latest revision as of 12:52, 11 May 2017
Contents
- 1 Introduction
- 2 Prerequisites
- 3 Baseline
- 4 Architecture
- 5 Installation
- 5.1 Ensure Active Server Pages are Allowed
- 5.2 Software Installation
- 5.3 Configuration of the IIS Filter
- 5.4 Modifying the OWA Authentication Pages
- 5.5 Modifying the login Page to stop the Single Channel Image automatically appearing
- 5.6 Modifying the login Page to allow Dual Channel On Demand Delivery
- 5.7 International OWA login Pages
- 5.8 Applying Settings
- 5.9 Activating the ISAPI filter
- 5.10 Configure The PINsafe Server
- 6 Verifying the Installation
- 7 Uninstalling the PINsafe Integration
- 8 Troubleshooting
- 9 Known Issues and Limitations
- 10 Useful Links
- 11 Additional Information
Introduction
PINsafe allows users to authenticate users of Outlook Web Access (OWA) on Microsoft Exchange Server 2003. An ISAPI filter installed on the Exchange server allows access to protected resources through the PINsafe authentication. NOTE: This document refers to the version of the filter numbered 1.2.0.0, and the configuration application with the same version number.
Prerequisites
Microsoft Exchange 2003 with OWA. It should be configured as a front-end server for MS Exchange, with forms-based authentication enabled.
Microsoft 2003 Server
PINsafe server: Requires PINsafe 3.x. PINsafe does not need to be installed on the same machine, but the target server must be able to connect to a PINsafe server without any authentication except that provided by PINsafe.
Users are able to login using standard OWA
Baseline
Microsoft Exchange 2003 with OWA using IIS 6.0
Microsoft 2003 Server
PINsafe 3.7
Architecture
The Exchange server makes authentication requests against the PINsafe server by XML authentication
Installation
Ensure Active Server Pages are Allowed
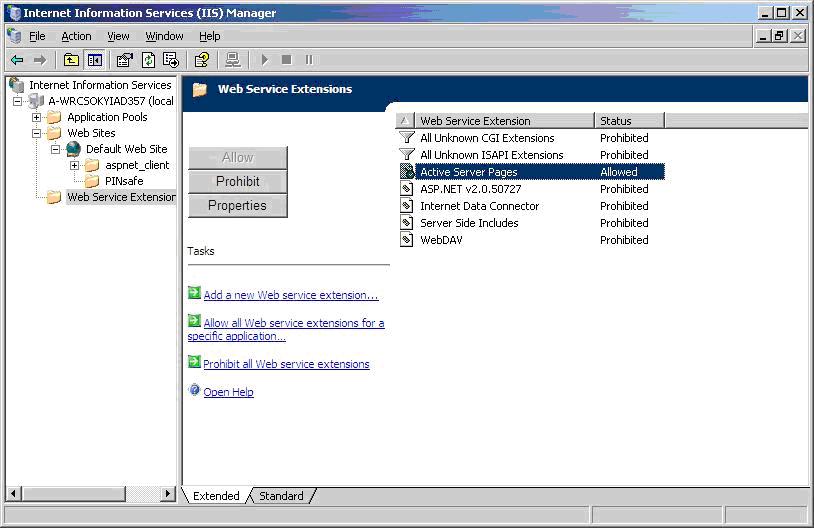
Allow Active Server Pages: to verify this, select the Internet Information Services Manager expand the required server then click on Web Service Extension.
Software Installation
On the Exchange server run the PINsafeIISFilter.exe. The filter must be installed in the Exchange Server authentication web folder, which by default is C:\Program Files\Exchsrvr\exchweb\bin\auth. If this is not correct, change the target folder before installation. Select Start Menu Folder. When details are correct click on Install. If the error ‘Incorrect Command Line Parameters’ is seen click on OK.
Configuration of the IIS Filter
The Filter Configuration should start after installation or can be started through the Start Menu.
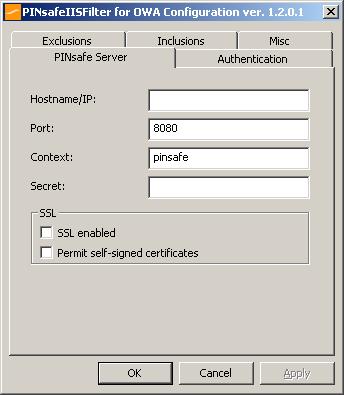
- PINsafe Server tab contains settings which define the PINsafe server which will be used to authenticate users.
Hostname/IP: The name or IP address of the PINsafe server.
Port: The port number used by the PINsafe server, 8080 for a software install or PINsafe virtual or hardware appliance (do not use 8443)
Context: The PINsafe install name usually pinsafe, or for a PINsafe virtual or hardware appliance proxy.
Secret: The common secret used to communicate with the PINsafe server. This value must be the same as the secret defined for the PINsafe agent.
SSL enabled Tick this box to require SSL (HTTPS) communication with the PINsafe server, for a PINsafe virtual or hardware appliance ensure the box is ticked.
Permit self-signed certificates Tick this box to allow SSL certificates to be self-signed. This also ignores other certificate errors, such as site names not matching. For a PINsafe virtual or hardware appliance tick this box until a valid certificate is applied.
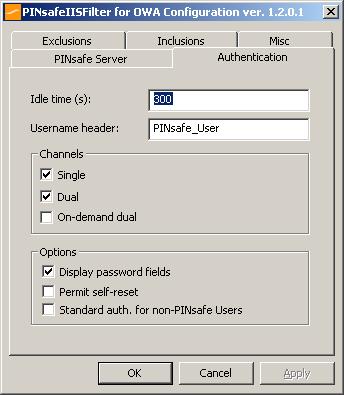
- The Authentication tab contains the following settings:
Idle time (s): The length of time in seconds that the authentication cookie is valid, provided you make no OWA requests in that time. If you do, the cookie is refreshed and the countdown starts again.
Username header:The name of a cookie which will pass the username of the authenticated PINsafe user. If this value is blank, no cookie will be provided.
Single Indicates that single channel security strings (i.e. TURing image) are permitted.
Dual Indicates that dual channel security strings (i.e. via e-mail, SMS) are permitted.
On-demand dual Indicates that the login page should display a button to request dual-channel security strings.
Display password fields Indicates that the login page should show a field for PINsafe password as well as OTC.
Permit self-reset Indicates that the user self-reset page should be enabled.
Standard auth. for non-PINsafe Users If enabled, users that PINsafe does not recognise will be allowed to authenticate using standard Active Directory methods. Note that this option requires PINsafe 3.5 or later. The option to allow unknown users to authenticate without Swivel authentication only applies to users not known to Swivel at all. You cannot specify that it only applies to a group of users, and not to other users who are known to Swivel, but not in a particular group.
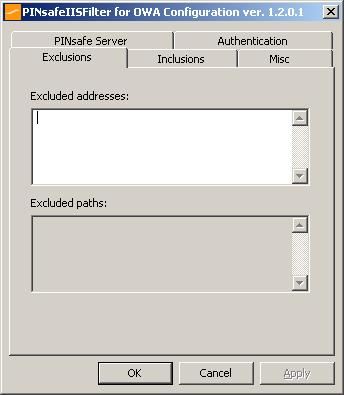
- Exclusions
Excluded Paths: This is a list of paths within the current website which should be exempt from PINsafe authentication. This is only relevant if the included paths list is empty, in which case all paths not on this list will be protected by PINsafe.
Excluded addresses: This is a list of IP addresses which are exempt from PINsafe authentication. All requests from these addresses are passed through without authentication.
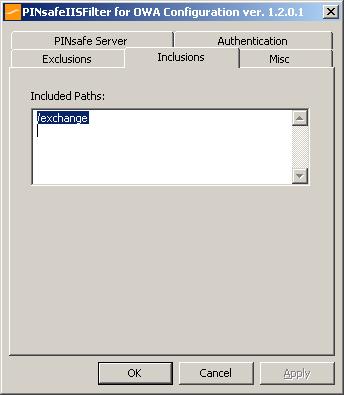
- Inclusions
Included Paths This is a list of paths within the current website which require PINsafe authentication. If this list is empty, the entire website will be protected except as indicated by the Exclusions tab. Paths should be one per line. You should at least ensure that the virtual folder “/exchange” is listed.
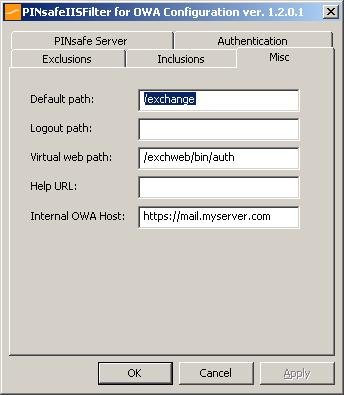
- Misc Tab
Default path: This is the path to which authenticated requests are directed if the login page is targeted directly. For this particular version of the filter, it should be “/exchange”. If a user tries to access a protected page, she is redirected to the login page, and after authentication, back to the page she was trying to access. If the user requests the login page directly, she will be redirected to this location after authentication.
Logout path: Requesting this path will result in the user being logged out. Subsequent requests will require re-authentication, if relevant. If this path is empty, users can only be logged out by closing the browser, or if the authentication times out.
Virtual web path: This is the path to the PINsafe authentication pages. The default for this version of the filter is “/exchweb/bin/auth”. You should only change this if your Exchange server has an unusual configuration.
Help URL: The URL for PINsafe IIS filter help. The filter does not come with help pages as standard, so this should only be filled in if help pages have been provided by the reseller or end user.
Internal OWA Host: This should be set to the URL of the OWA Exchange server, for example https://mail.myserver.com. Since this URL is called from the server itself, you could use https://localhost, but if you do that, make sure that you check the option to accept self-signed certificates, as the server certificate will not match the name “localhost”.
Modifying the OWA Authentication Pages
The installation process replaces the existing owalogon.asp file with one customised for PINsafe. The existing file is renamed to owalogon.asp.old. Note that if you have customised the OWA logon page, other than simply replacing images or text messages, then you will not be able to use the customised pages as they are. You will need to combine your own customisations with those necessary for PINsafe authentication. For help with this, please contact your reseller, or Swivel Secure.
Modifying the login Page to stop the Single Channel Image automatically appearing
By default the single channel authentication will appear when the username and AD password is entered and the user selects the OTC field. As a single channel session has started the PINsafe server is expecting an OTC to be entered from the Single Channel TURing image. If dual channel authentication is required then the automatic display of the Single Channel Turing image needs to be turned off. This can be done by modifying the login.asp file which by default is located in C:\Program Files\Exchsrvr\exchweb\bin\auth. The following needs to be removed from the username attribute field:
onblur=”checkUser()”
Modifying the login Page to allow Dual Channel On Demand Delivery
If you want to use only dual-channel on-demand and no other method, then you can manage this by a simple change to image.asp (under /exchweb/bin/auth). Edit this file, search for "SCImage" and replace it with "DCMessage". Leave the onblur attribute as it was. Dual channel authentication for the user and also On Demand Delivery should be enabled on the PINsafe Administration console under Server/Dual Channel.
International OWA login Pages
If you want to use an internationalized version of the logon page, you will need to modify the installed files by hand, as follows:
1. Open an Explorer window on the OWA authentication folder (by default C:\Program Files\Exchsrvr\exchweb\bin\auth).
2. Copy all of the files in the authentication folder except owalogon.asp.old and owaauth.dll to the language-specific folder you intend to use (if you need to support multiple languages, you will need to copy all of them to each folder).
3. Rename owalogon.asp.old back to owalogon.asp.
4. In each folder, make a backup copy of logon.asp (which was in the folder before), and copy all the lines beginning “CONST” from the beginning of the original logon.asp file to the copy of owalogon.asp you have just created, replacing similar lines in that file. You will also need to change the strings labelled “CONST L_OTC_Text” and “CONST L_StartSession_Text” with appropriate translations of the English strings “OTC” and “Show TURing”. Finally, rename owalogon.asp to logon.asp.
NOTE: Unlike previous versions of the PINsafe ISAPI filter (both standard and OWA), the PINsafe customisation is not visible immediately. Once you enter a username, the OTC field will appear, as will a TURing image. This means that it is no longer necessary to click a button to get a TURing image. However, a button is provided should you wish to refresh the image (if the first one is too difficult to read, for example). Note that if you enable the option to allow standard authentication for non-PINsafe users, and the user is not recognised, no OTC field or TURing image will be displayed. Note also in this case there may be a small delay while the user is checked.
Applying Settings
After the changes have been made click apply and from the Services application, usually found from the Control Panel Administrative Tools, restart the World Wide Web Publishing Services.
Activating the ISAPI filter
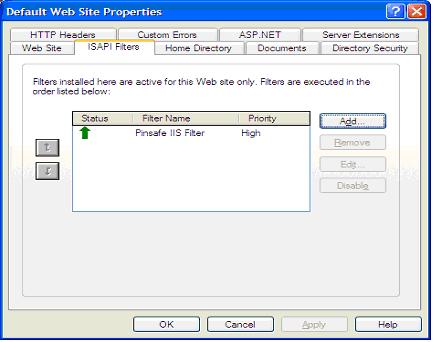
1. On the Internet Information Services Manager Select the Properties for the website
2. Select ISAPI filters
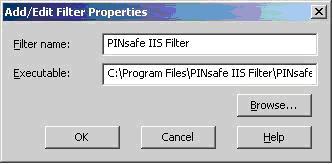
3. Select Add ISAPI filter
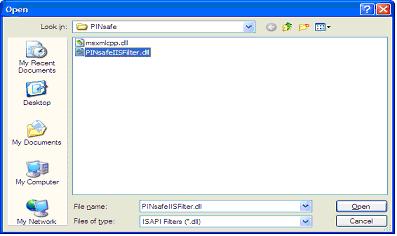
4. Select the Path to the PINsafe ISAPI filter. Note that the actual file you require will be PINsafeIISFilter.dll, located in the sub-folder bin of the installation folder.
Default: c:\Program Files\Exchsrvr\exchweb\bin\auth\bin\
5. Ensure PINsafe ISAPI filter is top filter then click on OK
Configure The PINsafe Server
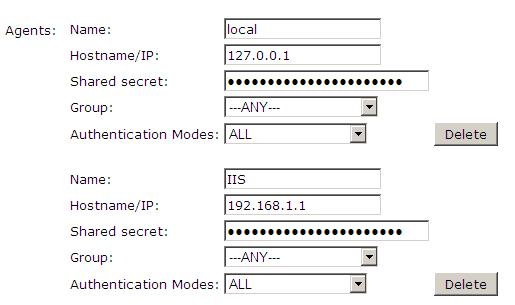
Configure a PINsafe Agent (For standard XML Authentication)
1. On the PINsafe Management Console select Server/Agent
2. Enter a name for the Agent
3. Enter the Exchange IP address
4. Enter the shared secret used above on the Exchange Filter
5. Click on Apply to save changes
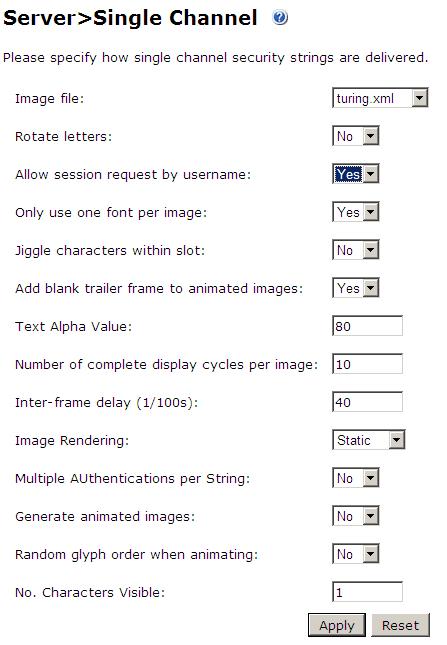
Configure Single Channel Access
1. On the PINsafe Management Console select Server/Single Channel
2. Ensure ‘Allow session request by username’ is set to YES
Verifying the Installation
To test the modifications, simply attempt to connect to Outlook Web Access. You should see the usual OWA authentication page, with two additions. Firstly, a third text box, for you to enter your PINsafe one-time code, and secondly, a new button labelled “Show TURing” (or the equivalent if you have changed the language). To log on, enter your username (including domain if required) and click the “Show TURing” button, if you are using TURing images. Enter your domain password and one-time code. Note that you should NOT use PINsafe passwords in this case. The authentication mechanism assumes that you have no PINsafe password, so will fail if you have. Now click “Log On”, and if your credentials are correct, you should see the OWA interface as before.
Uninstalling the PINsafe Integration
Uninstall the PINsafe IIS filter then, the original Logon.aspx must be restored by renaming Logon.asp.old to Logon.aspx.
Note that the installation creates a new Logon.aspx file in /owa/auth, and renames the original to Logon.asp.old. To complete uninstallation this file must be copied back again.
Troubleshooting
General Errors
Check the PINsafe and Windows server logs, and the IIS log C:\Windows\System32\LogFiles\W3SVC1 (the last directory may be different if you have more than one website on the same server).
Add an entry to the hosts file on the OWA server (C:\Windows\System32\drivers\etc\hosts). Add a new line to the file containing the following:
127.0.0.1 <owaserver.domain>
Replace <owaserver.domain> with the full external host name used to access the OWA server (not including https://). Then change the internal OWA host name on the PINsafe configuration to https://owaserver.domain (replacing owaserver.domain as before).
Reboot the Exchange server if it has not been started
Check the AD User is not required to Change their Password
Check the AD User account is not locked
User regularly times out after a short interval
The session is kept open by user activity. If this is insufficient then increase the cookie idle timeout value.
Turing image appears but user cannot authenticate.
Verify that the OWA is configured to use port 8080 and context pinsafe. port 8443 and context proxy will cause problems with authenticating users but allow the Turing image to be displayed.
No Login Page Errors
No login page, check the Exchange version
Check to see if an International version of OWA is being used
Single Channel (Turing) Image issues
Red Cross instead of Turing image, right click on red cross and look at its properties. Ensure PINsafe server is running.
If you do not see a Turing image when using start session then in a web browser test the following link from the IIS server. If an image is not seen, then there is a problem either with communicating with the PINsafe server or the Allow Image request by username may be set to No.
For PINsafe software and virtual or hardware appliance installs:
http://<pinsafe_server_ip>:8080/pinsafe/SCImage?username=<username>
Active Server Pages Errors
If the web page is redirected to the owalogon.asp page but an error message appears, then ensure that the Active Server Pages are allowed. To verify this select the Internet Information Services Manager, expand the required server then click on Web Service Extensions.
ISAPI Filter Issues
NOTE: after the first time you authenticate to OWA, you should check that the ISAPI filter is loaded and running properly. Go to the web site properties dialog and locate the ISAPI filters tab. If the PINsafe filter doesn’t have a green arrow next to it, or the priority shows as “Unknown”, then it is not working properly. You will still get redirected to the login page, and the built-in OWA security will handle that, but without the filter, it is possible for a knowledgeable person to authenticate with just the username and password, and bypass PINsafe.
The following procedure should ensure that the filter is loaded correctly:
1. Check which application pool your web application is running as, then go to the properties page for that application pool.
2. On the Identity tab, change the user to “Local System”. You will be warned that this is a potential security risk, but don’t worry – it won’t be left like this.
3. Restart IIS.
4. Authenticate to OWA. This should ensure that the filter is loaded: go back and check it.
5. You can now go back to the application pool and change the identity back to what it was originally: it would appear that it is only necessary to run as an administrator to get the filter to register initially.
Name resolution issue
The Exchange server may be looking for exchange.company.com from the internal network but cannot resolve it. Edit the hosts file mapping the name to 127.0.0.1.
Known Issues and Limitations
PINsafe requires Forms Based Authentication (FBA), whereas iPhone and other Smart Phones (plus Outlook Anywhere) will require Non Forms Based Authentication (NFBA). You cannot have FBA and NFBA running on the same front end Exchange server. You would have to create a new Exchange server as a front end to the existing Exchange server and put the PINsafe OWA filter on that. You should be able to maintain services to the existing Exchange server whilst creating a new Exchange front end. Eventually you should be able to disable access to the old OWA, but maintain NFBA authentication to your other services.
To check if FBA is enabled, in the exchange manager, go to the server, select protocols, http and choose properties.
Microsoft have published a workaround for this issue, see Microsoft OWA with OMA on Exchange 2003
Useful Links
HTTP to HTTPS Redirect [1]
Additional Information
For assistance in the PINsafe installation and configuration please firstly contact your reseller and then email Swivel Secure support at support@swivelsecure.com
