Aventail Integration
Contents
[hide]Introduction
This document outlines the steps required to integrate the SonicWALL Aventail SSL VPN with Swivel. SonicWALL Aventail SSL VPN appliances are able to use external RADIUS servers for providing authentication and Swivel provides RADIUS authentication, so this forms the basis for the integration approach. This document is designed for use with version 10.x of the SonicWALL Aventail and is significantly different to 9.x and earlier versions.
Swivel users can use either Swivel’s Single Channel ( TURing, Pattern) or Dual Channel (SMS, J2ME) methods to retrieve Security Strings, which are applied against the user’s PIN to extract a One-Time Code (OTC) which represents the password for an authentication request.
With Dual Channel methods, the user already holds one or more Security Strings on their mobile device (and can request more at any time) so with the Aventail VPN configured to use the matching Swivel server for RADIUS authentication, no further integration is required. However if Swivel is set to send many security strings in a single text message, then the login page can be modified to indicate to the user which string to use. For details of this refer to the additional details section. (The Authentication configuration section below describes how to achieve the RADIUS configuration).
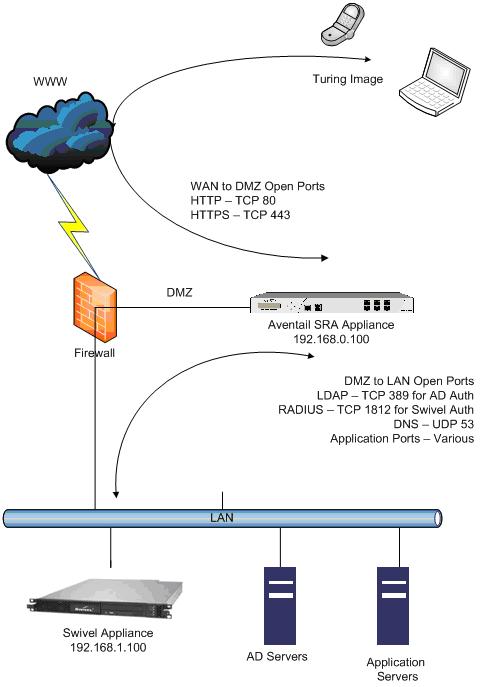
However with Single Channel methods, the user must be presented with a Turing or Pattern image at sign-in time (representing a single time-limited Security String), so they can extract their OTC. The SonicWall Aventail makes a proxy request to Swivel so a NAT rule is not required to Swivel, see below for details.
Prerequisites
SonicWall Aventail 10.5.2
or SonicWall Aventail 10.5.3 Client Hot Fix 003
Swivel 3.x
Baseline
SonicWall Aventail 10.5.2 and 10.6.2-196
Swivel 3.7
Architecture
The user connects to the SonicWALL Aventail VPN using a web browser, pointing to the appropriate sign-in URL for the VPN in question.
The SonicWALL Aventail VPN is configured to use Swivel for radius authentication. Users are stored and maintained in Swivel.
Swivel Configuration
Configuring the RADIUS server
On the Swivel Administration console configure the RADIUS Server and NAS, see RADIUS Configuration
Enabling Session creation with username
To allow the TURing image, PINpad and other single channel images, under Server/Single Channel set Allow session request by username to Yes.
Setting up Swivel Dual Channel Transports
SonicWall Aventail Integration
Configuring The Sonicwall Aventail for RADIUS Authentication
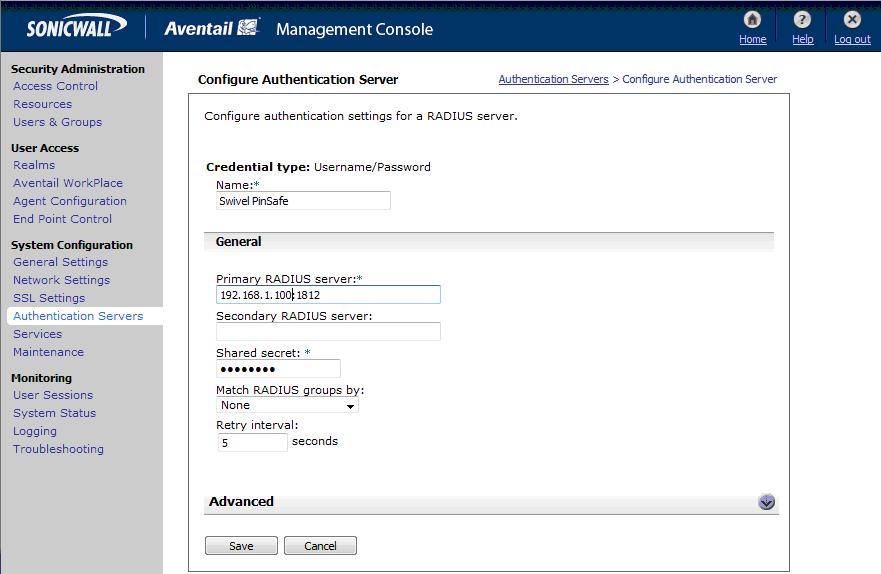
A new Authentication Server needs to be set up with RADIUS username/password authentication. The Primary RADIUS server needs to be set to the IP address of the Swivel virtual or hardware appliance followed by the authorisation port (see below). The secret needs to match the secret set on the NAS configuration screen.
If you want to configure a secondary Swivel RADIUS server for failover you would add the details of the server in the ‘Secondary RADIUS server’ section on this page.
Swivel can be configured as the Primary Authentication Server or the Secondary Authentication server using Chained Authentication, typically AD will be the Primary authentication server and Swivel as the secondary authentication server. To configure this on the SonicWall Aventail Administration console click on Realms, then click on the name of the realm to be modified, or click New and select an authentication server in the drop down list. Click Advanced and select a Secondary Authentication server (If it has not yet been defined click on New to create it).
SonicWALL Aventail Authentication Server RADIUS Configuration
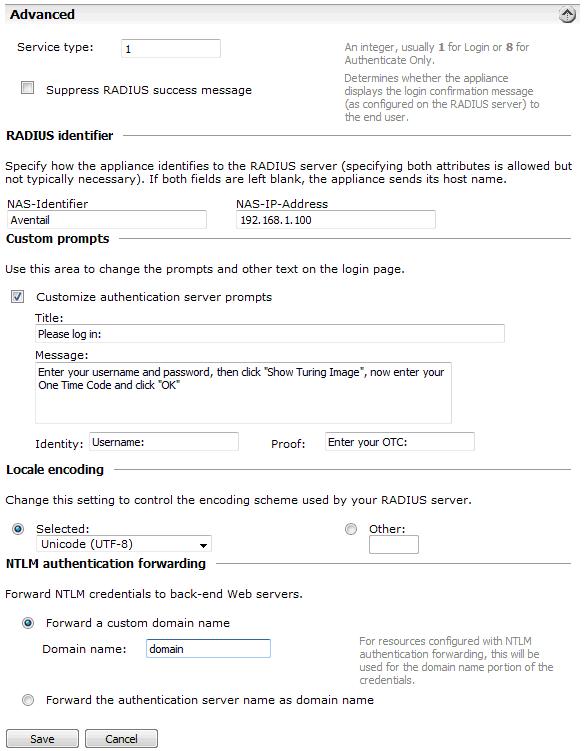
Under the Advanced section you should specify the NAS settings and you can also customise the password prompt to show “Enter your OTC:” or whatever is you preference.
Advanced RADIUS settings
Test the RADIUS authentication
At this stage it should be possible to authenticate by SMS, hardware Token, Mobile Phone Client and Taskbar to verify that the RADIUS authentication is working for users. Browse to the SSL VPN login page, and enter Username and if being used, the password. From the Swivel Administration console select User Administration and the required user then View Strings, and select an appropriate authentication string or OTC for the user. At the SSL VPN login enter the required OTC. Check the Swivel logs for a RADIUS success or rejected message. If no RADIUS message is seen, check that the Swivel RADIUS server is started and that the correct ports are being used.
Modifying the Aventail Sign-In Page for Turing
Note: When working with an Aventail Active Passive pair, the Master and Slave may need to be both configured, or shutdown the Slave whilst the master is configured for the changes to be evident.
Swivel sends Security Strings to users via SMS, J2ME (Dual Channel) or through a Turing image (Single Channel). The user extracts their One Time Code (OTC) from the Security String and enters that (preceded by their static Swivel password if they have one) into the SSL VPN log-in page.
If they were using Dual Channel (SMS or J2ME) they would have a security string ready and waiting on their mobile device. For Single Channel, we need some way of presenting a Turing image on the SSL VPN’s sign-in page.
Using the Aventail AMC, it is necessary to create a URL resource for the Swivel virtual or hardware appliance and then make it available to un-authenticated users. It is also necessary to create a custom authentication page to present the “Turing” button and also the image. The following steps describe how this is achieved.
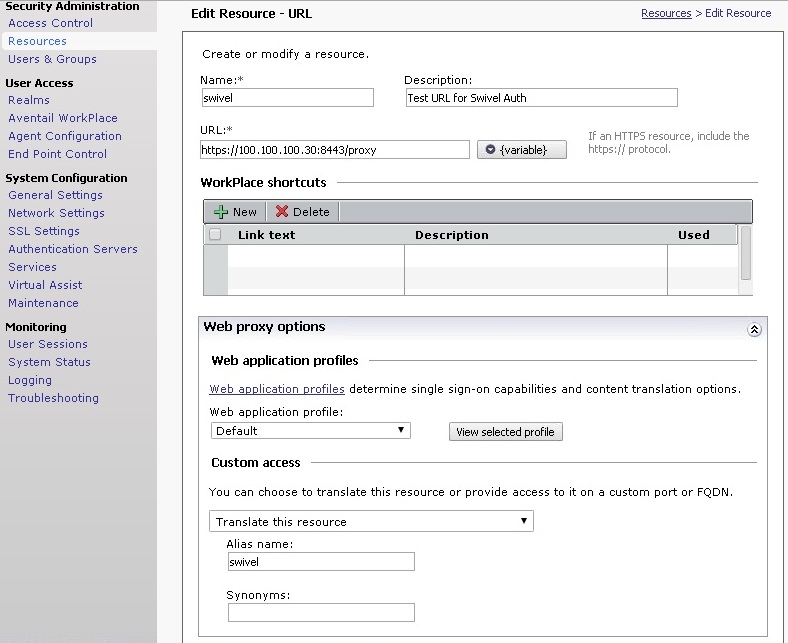
1. Create a URL resource and give it the name ‘swivel’ with the URL of the Swivel virtual or hardware appliance. URL = https://swivel_server:8443/proxy for a Swivel hardware or virtual virtual or hardware appliance, for a software only install see Software Only Installation. Do not create a workplace shortcut. Under Custom access select Translate this resource with an Alias = ‘swivel’. Creating an alias means the real URL of the Swivel virtual or hardware appliance is hidden from any user attempting to log in.
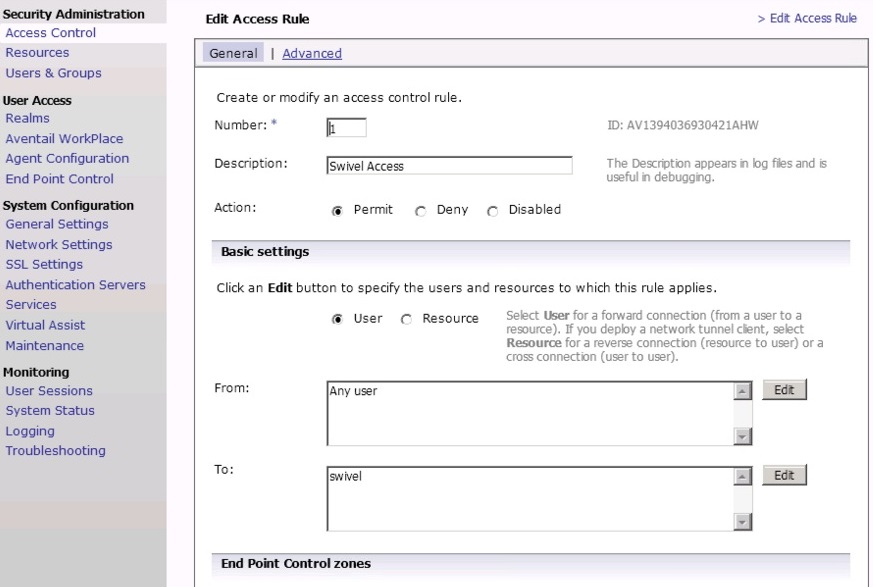
2. Create an ACL which allows all users access to the resource created in step 1. Select Access Control and New Rule with Permit access for type User with access from Any User to the Swivel Resource.
3. The Swivel resource is behind and therefore protected by the Aventail appliance. It is necessary to allow un-authentication access to the URL created in step 1, this is NOT the same as adding an ACL.
a. Using an SSH client such as PUTTY or WinSCP connect to the Aventail appliance as “root” with the admin password.
b. Then using Vi or an editor in WinSCP edit the file : /usr/local/app/mgmt-server/datastore/pending/sysconf/avconfig.xml
c. Find the resource id for the resource you just created (search for “swivel”): <webURL id="AV1193773540220KE" name="swivel" scope="all_descendants">
d. Then, find the following line: <webAuthRule enabled="true" id="WebSSLNullAuthRule" managed="system">
e. Add your resource id to the “destinations” block: <destinations_item refId="AV1193773540220KE"/>
f. Restart the management console: /etc/init.d/mgmt-server restart
g. Log in to the management console again and add/edit something; it doesn’t really matter what, you just want to get the “Pending changes” and then apply the changes.
h. Changes to the avconfig.xml file will not get replicated to a HA secondary appliance so the settings need to made on this appliance. Also, during firmware upgrades the changes to avconfig.xml may not be retained.
4. For the given workplace site it is necessary to create a customised authentication request page. The section below describes this in detail.
Creating A Custom Authentication Request Page
In order to have the TURing image displayed on the authentication page it is necessary to create and customise an “authentication-request.tmpl” file.
In version 10.0.0 and later the default WorkPlace template files contain only plain HTML: the rendering is done using cascading style sheets. The content has also been streamlined with the help of <div> tags that define more general divisions on the workplace portal pages (for example, <div id="container">, <div id="head">, <div id="foot">, and so on).
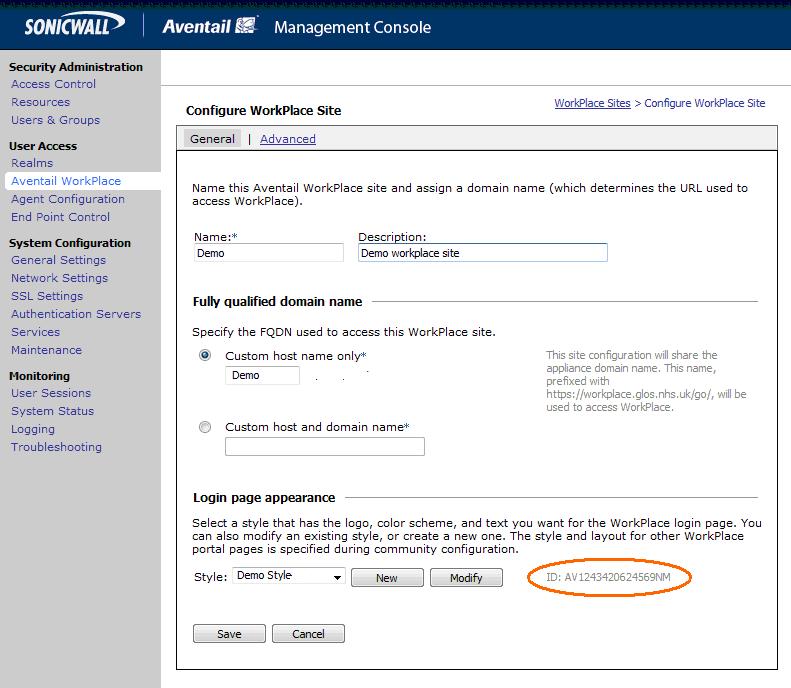
1. For the required workplace, create a new style (or use one already created) to be used only for this workplace. Make a note of the styles ID num. The style needs to be used for the SSL VPN login point for which Swivel authentication will be used.
Configure Workplace and record Style ID
The default WorkPlace template files should be used as a starting point for customized templates, and never edited directly, because your changes will be overwritten the next time you customize WorkPlace in AMC. The default templates are as follows (one for each supported display size):
 /usr/local/extranet/templates/extraweb.tmpl
 /usr/local/extranet/templates/compact-extraweb.tmpl
 /usr/local/extranet/templates/micro-extraweb.tmpl
When you create a workplace site, you specify a style for the login pages, which include realm selection, realm error, licensing error, and so on.
Copy the basic template from your v10 appliance: transfer /usr/local/extranet/templates/extraweb.tmpl (using WinSCP, for example) to your local computer. Log in using root and the admin password.
2. Save a copy of the extraweb.tmpl as authentication-request.tmpl.
Insert the following code into the new file directly below <!-- EXTRAWEB -->
 <!-- Swivel customisation starts here -->
  <!-- Add a button to request an image if required -->
  <input type=button name=btnTuring value="Show Turing Image" onclick=ShowTuring() class='submitbutton' style="visibility:visible; position: relative; left:50;top:60;width:75;">

  <img id=imgTuring name=imgTuring style="visibility:hidden;position: relative; left:40;top:70;">

  <script language="JavaScript">


  // Add on-blur method to username field so that
  // TURing image appears automatically
  if(document.getElementsByName("data_0")[0] != null) {
    document.getElementsByName("data_0")[0].onblur = function () {ShowTuring();};
  }


  function ShowTuring() {

 sUser=document.getElementsByName("data_0")[0].value;

   if (sUser=="") {
    alert ("Please enter your username first!");
    document.getElementsByName("data_0")[0].focus()
   }  else {
  //The IP address below must be the External IP of the Aventail VPN
  sUrl="https://FQDN_of_workplace/swivel/SCImage?username=";

  //Find the image using Mozilla compatible pproach...
  varImg = document.getElementById("imgTuring");

  //Set the image SRC and make it visible
  varImg.src = sUrl + sUser + "&random=" + Math.round(Math.random()*1000000);
  varImg.style.visibility = "visible";

  //Alternative approach - show image in Popup
  //window.showModalDialog(sUrl + sUser,null,"dialogWidth=305px;dialogHeight=110px;status:no;scroll:no;help:no;")

  //Set focus to the OTC input
  document.getElementsByName("data_2")[0].focus()
   }
  }


  </script>
The customization first adds a button to the page to allow the user to request a TURing image and a placeholder for the image so that it can be displayed.
<input type=button name=btnTuring value="Show Turing Image" onclick=ShowTuring() class='submitbutton' style="visibility:visible; position: relative; left:50;top:60;width:75;"> When the user presses the TURing button it calls the showTuring function that retrieves the image from Swivel via the alias that has been set up and makes the TURing image visible. The customisation also adds an "onblur" action to the username field. This means that when the user tabs away from the username field a TURing image will be automatically requested.
3. The newly customised authentication-request.tmpl needs to be saved to the correct location on the Aventail. Again using WinSCP, copy the file to the folder /usr/local/extranet/templates/AV(ID identified in Figure 7). The ID folder should have been created automatically when the style was created.
4. Make a change in the Aventail AMC such that “pending changes” can be applied.
5. The newly configured workplace configuration should now be available.
If your Aventail appliance is part of a HA pair then copy the customised authentication-request.tmpl file across to the backup appliance.
Verifying the Installation
Login using the Turing or SMS.
Example of a modified SonicWALL Aventail sign-in page
Known Issues and Limitations
None
Configuration Options
Turing Image Size
Change the line:
<img id=imgTuring name=imgTuring style="visibility:hidden;">
to
<img id=imgTuring name=imgTuring width="450" style="visibility:hidden;">
A width of 450 to gives a 50% larger image (300 is standard). Different values may be used.
Security String Index
To modify the login page to display the required Security String index rather than a TURing image use the following modifications. See also Multiple Security Strings How To Guide
1) The button that is used for TURing needs to be changed to request the index and rather than an image tag a text field is required to display the result.
<tr>
 <td>
  <input type=button name=btnTuring value="Get Index" onclick=ShowIndex()
  class='submitbutton' style="visibility:visible;width:100;">
 </td>
 <td >
  Use index : <INPUT class="indextext" TYPE="text" id="indextext" name="indextext" size = "3">
  to select your security string.
 </td>
</tr>
Similarly the onblur action should be changed
if(document.getElementsByName("data_0")[0] != null) {
   document.getElementsByName("data_0")[0].onblur = function () {ShowIndex();};
}
2) The ShowIndex function then needs adding
function ShowIndex() {
{
  sUrl="https://FQDN_of_workplace/swivel/SCImage?username="
  sUser=document.getElementsByName("data_0")[0].value;
  if (sUser=="") {
   alert ("Please enter your username first!");
   document.getElementsByName("data_0")[0].focus()
 }
 else
 {
  updateindex(sUrl,sUser);
  document.getElementsByName("data_1")[0].focus()
 }
}

function updateindex(sUrl,sUser)
{
 //this means call the getText function and when callback is called,
 // call setIndex
 getText(sUrl  + sUser, setIndex) + "&random=" + Math.round(Math.random()*1000000);
}

 function getText (url, callback) {
 var request = null;
 //Initialize the request variable.
 if (window.XMLHttpRequest) {
 // Are we working with mozilla?
 request=new XMLHttpRequest();
 }
 else
 {
 //Not Mozilla, must be IE
 request=new ActiveXObject("Microsoft.XMLHTTP");
 }
 if (request==null) {
  //If we couldn't initialize request...
  alert("Your browser doesn't support the Get Index Button, sorry.");
  return false;
  }
   request.onreadystatechange = function() {
   if (request.readyState == 4 && request.status == 200)
   {
     callback(request.responseText);
   }
 }

   request.open("GET", url);
   request.send(null);
}

function setIndex(text){
 index = document.getElementById("indextext");
 if(text.length < 3){
  index.value = text;
 } else {
  index.value = "";
 }
}
TURing and SMS
To support TURING and SMS Index you need to include both buttons and both sets of scripts.
But not have any onBlur action on the username, as the user may choose either option.
Manual Turing Display
To stop the automated Turing display remove the .onblur entry. Note you would use this where dual channel authentication is required. The starting of a single channel session makes the Swivel server expect a single channel login:
  // Remove on-blur method to username field so that
  // TURing image appears automatically
   if(document.getElementsByName("data_0")[0] != null) {
     document.getElementsByName("data_0")[0] = function () {ShowTuring();};
   }
Automated Turing Display
To automate the Turing display we can add the below lines of code. Note you would not use this where dual channel authentication is required as the starting of a single channel session makes the Swivel server expect a single channel login:
  // Add on-blur method to username field so that
  // TURing image appears automatically
   if(document.getElementsByName("data_0")[0] != null) {
     document.getElementsByName("data_0")[0].onblur = function () {ShowTuring();};
   }
Example:
 <!-- Swivel customisation starts here -->
  <!-- Add a button to request an image if required -->
  <input type=button name=btnTuring value="Show Turing Image" onclick=ShowTuring() class='submitbutton' style="visibility:visible; position: relative; left:50;top:60;width:75;">

  <img id=imgTuring name=imgTuring style="visibility:hidden;position: relative; left:40;top:70;">

  <script language="JavaScript">


  // Add on-blur method to username field so that
  // TURing image appears automatically
  if(document.getElementsByName("data_0")[0] != null) {
    document.getElementsByName("data_0")[0].onblur = function () {ShowTuring();};
  }


  function ShowTuring() {

  {
   sUser=document.getElementsByName("data_0")[0].value;

   if (sUser=="") {
    alert ("Please enter your username first!");
    document.getElementsByName("data_0")[0].focus()
   }

  else

  {
  //The IP address below must be the External IP of the Aventail VPN
  sUrl="https://FQDN_of_workplace/swivel/SCImage?username=";

  //Find the image using Mozilla compatible pproach...
  varImg = document.getElementById("imgTuring");

  //Set the image SRC and make it visible
  varImg.src = sUrl + sUser + "&random=" + Math.round(Math.random()*1000000);
  varImg.style.visibility = "visible";

  //Alternative approach - show image in Popup
  //window.showModalDialog(sUrl + sUser,null,"dialogWidth=305px;dialogHeight=110px;status:no;scroll:no;help:no;")

  //Set focus to the OTC input
  document.getElementsByName("data_2")[0].focus()
   }
  }
  }

  </script>
Troubleshooting
Check the Swivel logs for TURing images and RADIUS requests.
INFO RADIUS: <0> Access-Request(1) LEN=78 192.168.1.1:4175 PACKET DROPPED - Duplicate packet from NAS
This can be caused by the following:
- If the Swivel server sends the reply but it is not received by the access device, the access device may try to resend the RADIUS request. This can be caused by the Access device sending a RADIUS request from an external interface, but not accepting the response through that external interface.
If a red cross appears instead of the TURing image it is likely that a self signed certificate may be preventing the image from appearing. To verify this, in I.E. right click on the red cross and click on properties, copy the URL into the URL bar and see if a certificate error occurs with an image. The URL will be similar to:
virtual or hardware Appliance: https://<VPN URL>:8443/proxy/SCImage?username=test
For a software only install see Software Only Installation
To overcome this install a valid certificate on the Swivel virtual or hardware appliance. Using non SSL communication will likely result in the web browser creating a pop up about SSL and non SSL communications in the web page.
Additional Information
For assistance in the Swivel installation and configuration please firstly contact your reseller and then email Swivel Secure support at support@swivelsecure.com
