Difference between revisions of "F5 SAM Integration"
m (1 revision imported) |
|
(No difference)
| |
Latest revision as of 12:52, 11 May 2017
Contents
[hide]F5 Secure Access Manager (SAM) Integration Notes
This article describes how to integrate the F5 Secure Access Manager with Swivel. The article covers two aspects:
- The integration of the two servers so that the F5 uses Swivel as its RADIUS server
- The modification of the F5 login page to include the TURing image or other Swivel elements as required.
RADIUS Integration
To use Swivel with F5 SAM you need to enable the Radius Server on PINsafe. (On the RADIUS->Server page)
A NAS Entry then need to be created that includes the F5 server ip address/hostname and a shared secret.
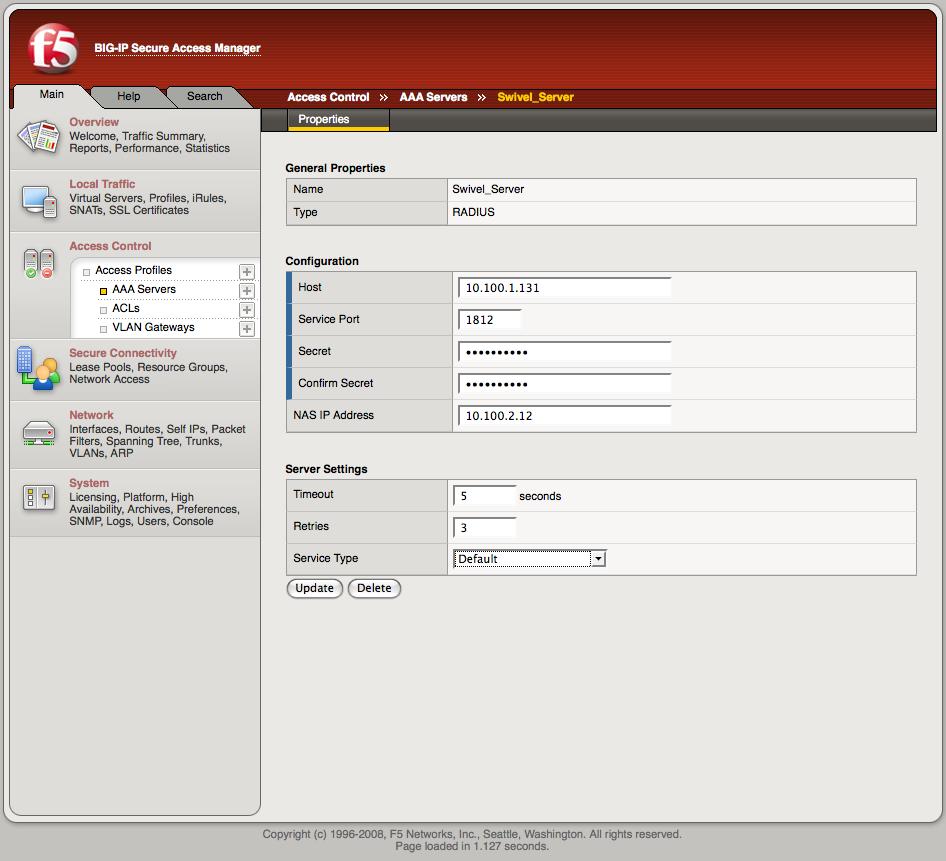
The associated configuration then needs to be created on the F5 server.
This is done on the Access-Control->AAA-Servers screen.
Once this entry has been created it can be used when defining Access Profiles.
It is important to remember the name of the profile created as this will be required for the customisation.
Test the RADIUS authentication
At this stage it should be possible to authenticate by SMS, hardware Token, Mobile Phone Client and Taskbar to verify that the RADIUS authentication is working for users. Browse to the SSL VPN login page, and enter Username and if being used, the password. From the Swivel Administration console select User Administration and the required user then View Strings, and select an appropriate authentication string or OTC for the user. At the SSL VPN login enter the required OTC. Check the Swivel logs for a RADIUS success or rejected message. If no RADIUS message is seen, check that the Swivel RADIUS server is started and that the correct ports are being used.
Log-in page Customisation
To modify the log-on page to include a TURing image you need secure-shell access (SSH) to the server.
Assuming that the Access Profile is called pinsafe the modifications are implemented by editing the file
/config/customization/advanced/logon/pinsafe_act_logon_page_ag/logon_en.inc
The steps are as follows.
1. Change directory to the required location
cd /config/customization/advanced/logon/pinsafe_act_logon_page_ag
2. Take a back-up of the existing file. Note that this example assumes that the Access Policy uses English. If another language is specified then you need to edit the corresponding file, eg log_fr.inc for French.
cp log_en.inc tmp_logon_en.inc
3. Edit the login file or copy a modified version of the file onto the server.
An example modified script is shown here. The required modifications are between the lines of asterisks. The setting of the sUrl variable needs to correspond to the PINsafe server being used.
4. To register the changes the following commands must be executed.
b customization group pinsafe_act_logon_page_ag action update
b profile access pinsafe generation action increment
Testing
Now when the F5 server is accessed via the pinsafe access policy the user should see a modified login page with the option to request a TURing image.
The user should enter their username and see a TURing image when the clcik the TURing button. At this point a Session Start message for the user should show in the PINsafe logs.
If no image shows, check that the URL is correct and ensure that there is no firewalls blocking the request.
Also check that Session Create by Username is enabled on the PINsafe server.
The user should then enter their one-time code. The login.
If the log-in fails, check the Swivel log files to see if a RADIUS request was logged. If not then check the settings for the RADIUS on F5 and Swivel to ensure the IP Addresses, port numbers and shared secrets all match. Also check that no firewalls are blocking the RADIUS requests.
If RADIUS attempts are being logged but authentication is failing, check that the session was started correctly and that there is no password associated with the account etc.
