Oracle WebLogic
Contents
[hide]- 1 Overview
- 2 Prerequisites
- 3 Baseline
- 4 Architecture
- 5 Installation
- 6 Verifying the Installation
- 7 Uninstalling the Swivel Integration
- 8 Troubleshooting
- 9 Known Issues and Limitations
- 10 Additional Information
Overview
This document outlines the integration of Oracle WebLogic with Swivel using SAML with Swivel as an Identity Provider (IdP). It assumes that the Identity Provider and SAMLSwivelDemo app are installed on the same Swivel appliance.
Swivel can provide Two Factor authentication with SMS, Token, Mobile Phone Client and strong Single Channel Authentication TURing, Pinpad or in the Taskbar.
To use the Single Channel Image such as the TURing Image, the Swivel server must be made accessible. The client requests the images from the Swivel server, and is usually configured using a NAT (Network Address Translation), often with a proxy server. The Swivel virtual appliance or hardware appliance is configured with a proxy port to allow an additional layer of protection.
Prerequisites
Oracle WebLogic
Swivel 3.9 onwards
Swivel AuthenticationPortal.zip. The file containing the IdP and login page to authenticate using Swivel.
Swivel SAMLSwivelDemo.zip. A simple app which sits on the service provider server to demonstrate how a user needs to be authenticated.
Baseline
Swivel 3.9, 3.10
Oracle WebLogic 12.1.1
Architecture
Swivel is configured as an Identity Provider, see the following Oracle Documentation.
Installation
To implement the solution there are several steps:
- Setup up the Identity Provider (IdP) (Authentication Portal)
- Generate the IdP metadata (which is used to create the relationship between the IdP and Service Provider).
- Setup the service provider (the federation service and its association with the Idp)
- Create a user within PINsafe and Weblogic
- Install the demonstration application
- Test the solution
Swivel Integration Configuration
Configuring Swivel for Agent XML Authentication
The IdP is usually deployed on the Swivel hardware or virtual appliance, and a default localhost Agent is usually pre-configured. To make any changes to this see Agents How to Guide
Configuring Swivel for Single Channel Images
If Swivel Single Channel images are to be used for authentication, then the following guide can be used.
Configuring Swivel for Dual Channel Authentication
If Swivel Dual Channel authentication methods are to be used, refer to the following guide:
Configuring the Swivel Authentication Portal
Download and extract the AuthenticationPortal.war file from the AuthenticationPortal.zip and copy this file using WinSCP to /usr/local/tomcat/webapps2 where a a folder called AuthenticationPortal should appear.
Within the AuthenticationPortal folder, there will be folder called WEB-INF, with the settings.xml file (/usr/local/tomcat/webapps2/WEB-INF/settings.xml). Right click settings.xml and either Edit the file or Open in another editor such as Notepad++.
 <?xml version="1.0" encoding="UTF-8"?>
 <!DOCTYPE properties SYSTEM "http://java.sun.com/dtd/properties.dtd">
 <properties>
 <entry key="pinsafessl">false</entry>
 <entry key="pinsafeserver">localhost</entry>
 <entry key="pinsafecontext">pinsafe</entry>
 <entry key="pinsafesecret">secret</entry>
 <entry key="pinsafeport">8080</entry>
 <entry key="imagessl">false</entry>
 <entry key="imageserver">localhost</entry>
 <entry key="imagecontext">pinsafe</entry>
 <entry key="imageport">8080</entry>
 <entry key="selfsigned">true</entry>
 <entry key="serviceProviderEndpointURL">https://login.salesforce.com/?saml=02HKiPoin4nQspKPHoScmudQmsKtM.qRKnViSBCmhO5IC52m5VptCNwO.p</entry>
 <entry key="audience">https://saml.salesforce.com</entry>
 <entry key="certificateIssuer">SAML_SP</entry>
 <entry key="publicKeyFilePath">/keys/pinsafe/ssl/dsapubkey.der</entry>
 <entry key="privateKeyFilePath">/keys/pinsafe/ssl/dsaprivkey.der</entry>
 <entry key="certificateFilePath">/keys/pinsafe/ssl/dsacert.pem</entry>
 </properties>
pinsafessl Communication between the IdP and Swivel. If SSL is used on the Swivel server set this to true, otherwise false. For a Swivel Hardware or Virtual appliance this should be changed to false when using port 8181 if Swivel is deployed in webapps2.
pinsafeserver Communication between the IdP and Swivel. Where the IdP is installed on the same server as Swivel this should be set to localhost.
pinsafecontext Communication between the IdP and Swivel. This is the install context and is usually pinsafe.
pinsafesecret Communication between the IdP and Swivel. By default a Swivel hardware or virtual appliance uses this value as the shared secret.
pinsafeport Communication port between the IdP and Swivel. For a Swivel Hardware or Virtual appliance this should be changed to 8181 if Swivel is deployed in webapps2 and uses a non SSL connection.
imagessl Communication between the IdP and User. If SSL is used on the Swivel server set this to true, otherwise false.
imageserver Communication between the IdP and User. If SSL is used on the Swivel server set this to true, otherwise false. By default a Swivel hardware or virtual appliance uses SSL.
imagecontext Communication between the IdP and User. This is the install context and is usually pinsafe.
imageport Communication between the IdP and User. For a Swivel Hardware or Virtual appliance this should be changed to 8443 although 443 or other port can also be used.
selfsigned Communication between the IdP and User. If SSL is used on the Swivel server with a self signed certificate then set this to true, otherwise false. By default a Swivel hardware or virtual appliance uses SSL with a self signed certificate.
serviceProviderEndpointURL the Published Site URL, defined in Setting up the Service Provider. Example:https://192.168.10.10/saml2
audience
certificateIssuer SAML_SP
publicKeyFilePath path to the public key usually /keys/pinsafe/ssl/dsapubkey.der
privateKeyFilePath path to the private key usually /keys/pinsafe/ssl/dsaprivkey.der
certificateFilePath path to the certificate usually /keys/pinsafe/ssl/dsacert.pem
Create private keys and certificates
Communication between Oracle and the Swivel instance is secure through the use of certificates.
Creating DSA Private Key
DSA key generation involves two steps, and can be done through the command line on a Swivel virtual appliance or hardware appliance:
1.
openssl dsaparam -out dsaparam.pem 2048
2.
openssl gendsa -out dsaprivkey.pem dsaparam.pem
The first step creates a DSA parameter file, dsaparam.pem, which in this case instructs OpenSSL to create a 2048-bit key in Step 2. The dsaparam.pem file is not itself a key, and can be discarded after the public and private keys are created. The second step actually creates the private key in the file dsaprivkey.pem which should be kept secret.
Export the key into a DER (binary) format. You can do so with the following steps:
1.
openssl dsa -in dsaprivkey.pem -outform DER -pubout -out dsapubkey.der
2.
openssl pkcs8 -topk8 -inform PEM -outform DER -in dsaprivkey.pem -out dsaprivkey.der -nocrypt
Step 1 extracts the public key into a DER format. Step 2 converts the private key into the pkcs8 and DER format. Once you've done this, you can use this public (dsapubkey.der) and private (dsaprivkey.der) key pair.
Creating a Certificate
Once you have your key pair, it's easy to create an X.509 certificate. The certificate holds the corresponding public key, along with some metadata relating to the organization that created the certificate. Follow this step to create a self-signed certificate from either an RSA or DSA private key:
openssl req -new -x509 -key dsaprivkey.pem -out dsacert.pem
After you answer a number of questions, the certificate will be created and saved as dsacert.pem.
The created keys, dsapubkey.der and dsapubkey.der need to be copied to the keys folder or wherever specified within settings.xml
The dsacert.pem certificate needs to be uploaded to the GoogleApps server.
Generating IdP metadata
SAML metadata is generated by the IdP to simplify the mapping process between itself and the Service Provider.
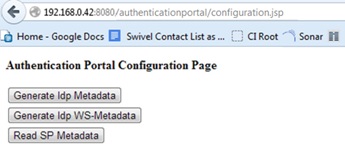
The AuthenticationPortal folder should be located under /usr/local/tomcat/webapps2. In order to gain access to the Authentication Portal webpage, you must navigate to https://<IPAddress>:8443/AuthenticationPortal/configuration.jsp. (case sensitive).
This will display the configuration page as shown below. From here you should press ‘Generate Idp Metadata’.
If successful, he metadata will be written to the root of the web application with the message "Metadata successfully written to" and the full path and filename displayed. Make a note of the destination which will be used later when configuring the Service Provider.
WebLogic Integration Configuration
Configure a WebLogic User
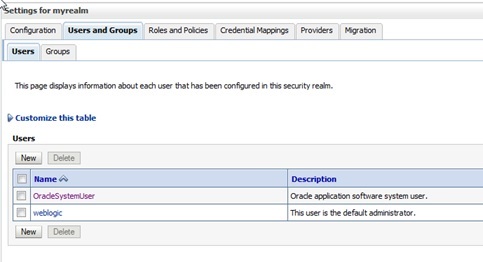
On the WebLogic Administration console main menu select Security Realms, select myrealm then select Users and Groups and then the Users tab to show following main screen:
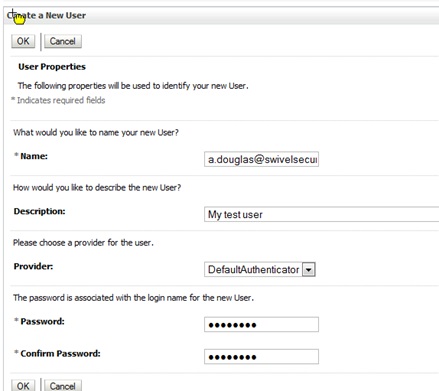
Select New then input a username, this should match to the e-mail address of a Swivel user test user. Enter a dummy password as this will not be used by this integration, then press OK to save.
Setting up the Service Provider
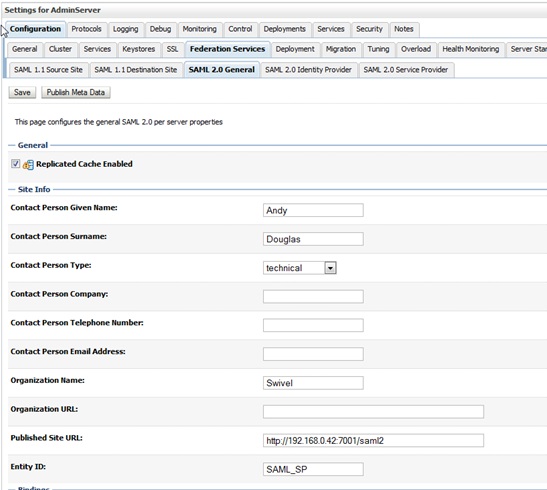
On the WebLogic Administration console main menu select Environment, Servers then select AdminServer(admin). Then select Configuration, Federation Services and SAML 2.0 General to get the following screen:
Published Site URL should be your WebLogic URL + /saml2 and the Entity ID should be SAML_SP to match up other aspects of the configuration. Ensure that under the Bindings option, Recipient Check Enabled is not checked and is therefore disabled. Enter other details as appropriate then press Save.
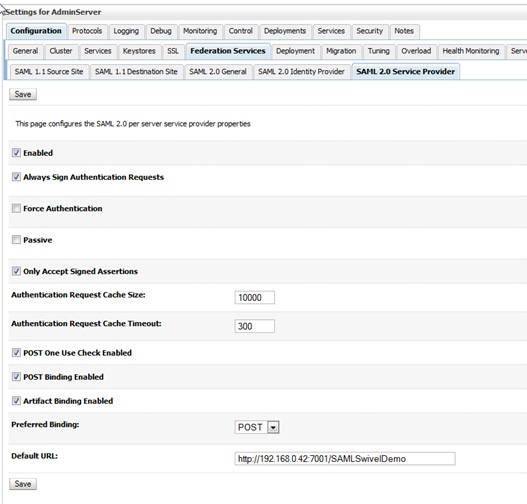
Then, from the same screen, select SAML 2.0 Service Provider to get the following screen:
Ensure the checkboxes are set as above and for the Default URL enter the path to the SAMLSwivelDemo. Press Save.
Making sure that the Published Site URL is your WebLogic URL and by adding /saml2. E.g. http://192.168.10.10/saml2 - This is your serviceProviderEndpointURL.
Going back to the section Setting up the IdP, you can go back to the settings.xml and add for example:
<entry key="serviceProviderEndpointURL">https://192.168.10.10/saml2</entry>
Specifying the IdP
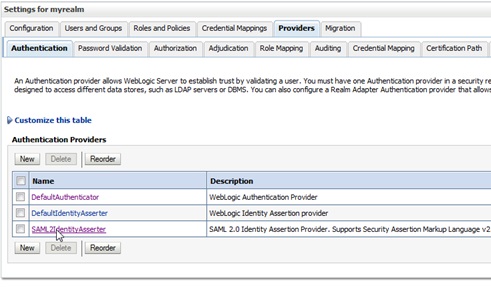
On the WebLogic Administration console main menu select Security Realms, select myrealm then select Providers and Authentication to show following main screen:
Select New to create a SAML2IdentityAsserter and name it SAML2IdentityAsserter as shown here:
Pressing OK will take you to the following screen.
At this point you need to activate the changes. One way you can do this is from the main menu select Environment, select Servers then select AdminServer(admin). Then select Control. Select the checkbox next to AdminServer(admin) and Shutdown. Then restart the server and logon to the admin console.
Return to the same screen and select the SAML2IdentityAsserter.
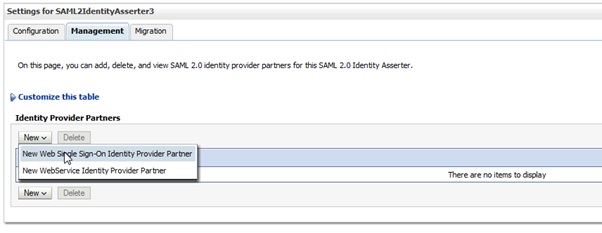
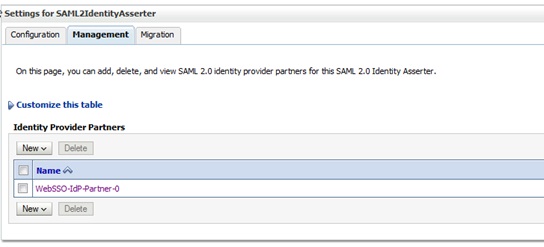
Then select Management to get the screen below:
Select New and New Web Single Sign-On Identity Provider Partner as shown below:
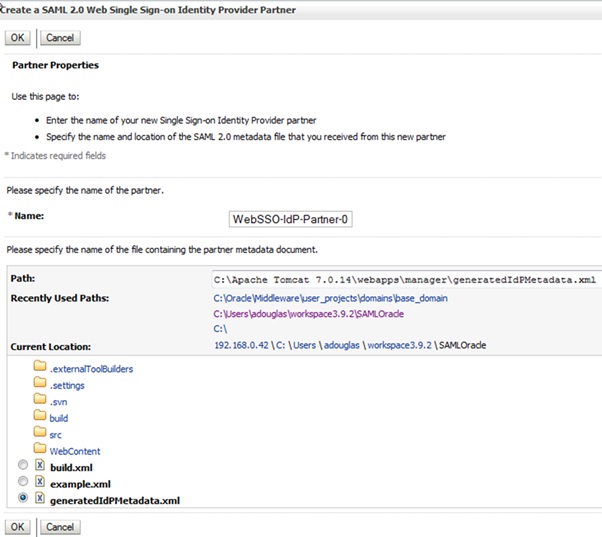
Select New then locate and select the IdP metadata as shown below. Press OK to save
Thus will take you to the following screen:
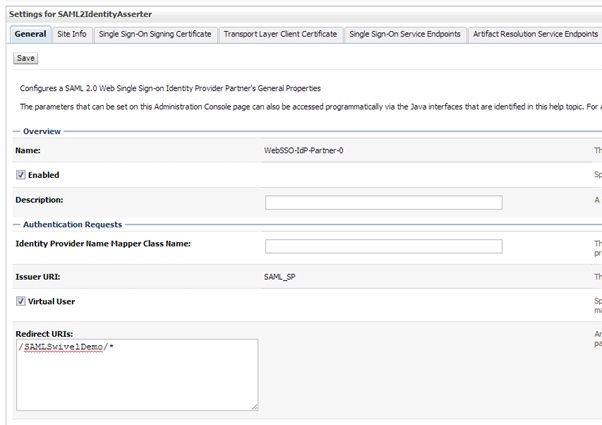
Select WebSSO-IdP-Partner-0 which will take you to the following screen:
Ensure Enabled and Virtual User are checked and that Redirect URIs is set to /SAMLSwivelDemo/*. Press Save to save your settings.
Credential Mapping Provider
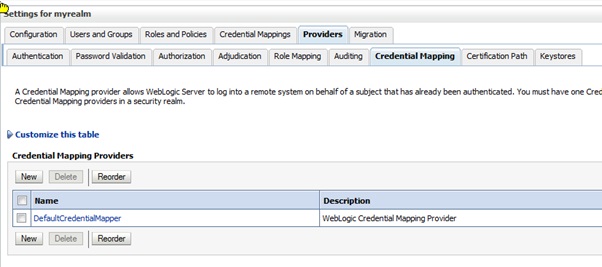
On the WebLogic Administration console main menu select Security Realms, myrealm then select Providers and Authentication to show following main screen:
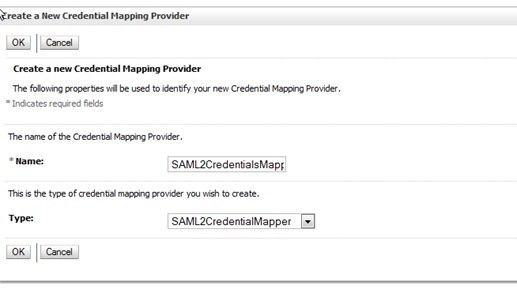
Select New and then enter a name of SAML2CredentialsMapper and select type of SAML2CredentialsMapper as below (then Press OK to save):
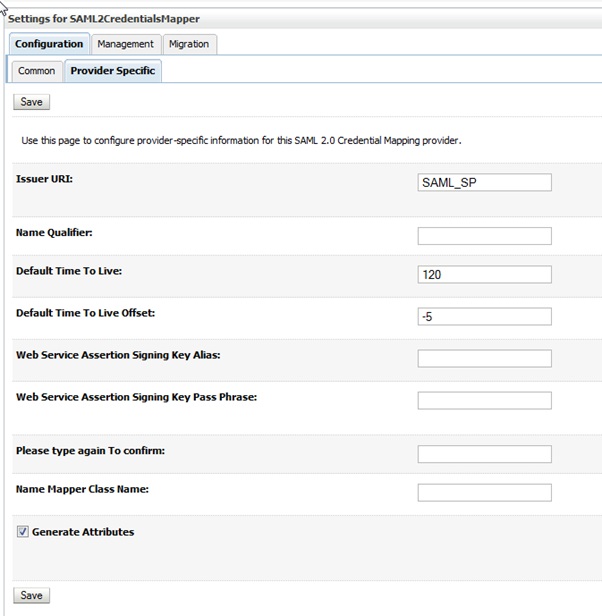
Select SAML2CredentialsMapper then configuration and Provider Specific. For the Issuer URI enter SAML_SP as shown below (then press Save):
Setting up the demo application
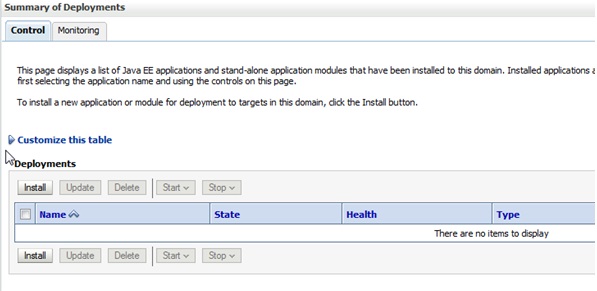
On the WebLogic Administration console main menu select Deployments to get the main screen looking as such:
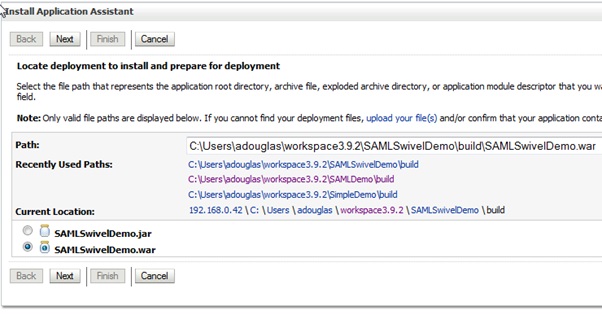
Select Install then locate the WAR file for the SAMLSwivelDemo as such:
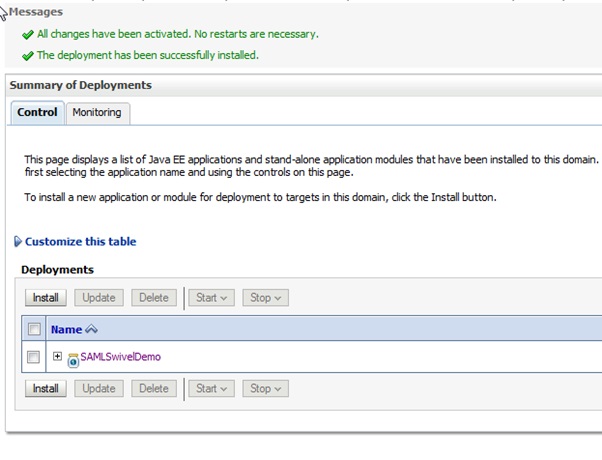
Click Next, Next then Finish (using all the default options) to result in the following Screen:
The Demo should now be accessible.
Additional Installation Options
Verifying the Installation
Open a web browser and enter the URL for the root of the demo. In this case: http://weblogicserverURL:7001/SAMLSwivelDemo
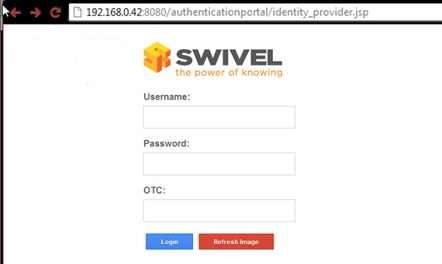
This will direct the user to the identity provider’s login page as such:
As per standard logon, enter the username and password (if required), start the session, enter the OTC and press ‘Login’
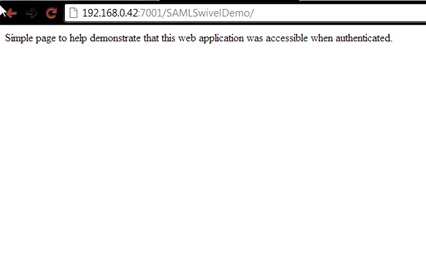
If successful you will be authenticated and redirected to the SAMLDemo page as such:
Uninstalling the Swivel Integration
Troubleshooting
Check the Swivel logs
Enabling WebLogic debugging
To enable SAML logging On the WebLogic Administration console main menu select AdminServer->Configuration->Debug->Weblogic->Security->SAML2 and enable.
Now you can go to Diagnostics ->Log files ->ServerLog to view what is happening.
Error Messages
javax.security.auth.login.LoginException: [Security:090377]Identity Assertion Failed, weblogic.security.spi.IdentityAssertionException: [Security:090377]Identity Assertion Failed, weblogic.security.spi.IdentityAssertionException: [Security:096537]Assertion is not yet valid (NotBefore condition). at com.bea.common.security.internal.service.IdentityAssertionServiceImpl.assertIdentity(IdentityAssertionServiceImpl.java:89)
This has been seen where the time on the Swivel server is ahead of the WebLogics server. Ensure they both have the same time.
<BEA-000000> <[Security:096552]Illegal destination: https://<server_name>:<port>/saml2/sp/acs/post of assertion response.>
This is due to the Recipient destination value not matching the local (SP) assertion consumer URL. On the Weblogic Console => Environment => Servers => AdminServer => Configuration => Federation Services => SAM 2.0 General => disable “Recipient Check Enabled” checkbox.
Known Issues and Limitations
Additional Information
For assistance in the Swivel installation and configuration please firstly contact your reseller and then email Swivel Secure support at support@swivelsecure.com.
