Microsoft OWA 2007 IIS Integration
Contents
Introduction
PINsafe allows users to authenticate users of Outlook Web Access (OWA) using Microsoft Exchange Server 2007.
Active Sync users are able to receive email without PINsafe authentication as this uses a separate URL.
Prerequisites
Microsoft Exchange 2007 with OWA
Microsoft 2003/8 server
Microsoft .Net Framework version 3.5
PINsafe 3.x
Users are able to login using standard OWA
IIS Filter for OWA 2007 version 2.7. This uses a different authentication mechanism from 2.6, which resolves problems reported by some users. Also some cosmetic fixes: in particular, Pinpad images are correctly sent as PNG format, rather than JPG.
Older versions:
IIS Filter for OWA 2007 version 2.6, including support for Pinpad and Change PIN
IIS Filter for OWA 2007 version 2.3
IIS Filter for OWA 2007 version 2.0
Login page for OWA 2007 8.2.301 (not necessary for version 2.6).
Baseline
For version 2.3 or later:
- Microsoft Exchange 2007 service Pack 3 with OWA using IIS
- Microsoft 2008 server
- PINsafe 3.7 or later
For version 2.0
- Microsoft Exchange 2007 service Pack 1 with OWA using IIS
- Microsoft 2003 server
- PINsafe 3.7 or later
Architecture
The Exchange server makes authentication requests against the PINsafe server by XML authentication
Installation
Software Installation
Run the executable to install it on the Exchange Server. If your Exchange Server instance is not installed in the default location (C:\Program Files\Microsoft\Exchange Server\V14), you will need to modify the installation path. The installation path should be <ExchangeServerRoot>\ClientAccess\OWA
Configuration of the IIS Filter
After installation modify the settings. The Filter Configuration should start after installation or can be started through the Start Menu. If the Exchange Server installation is not in the default location, select the OWA directory as above in which to modify the web.config file.
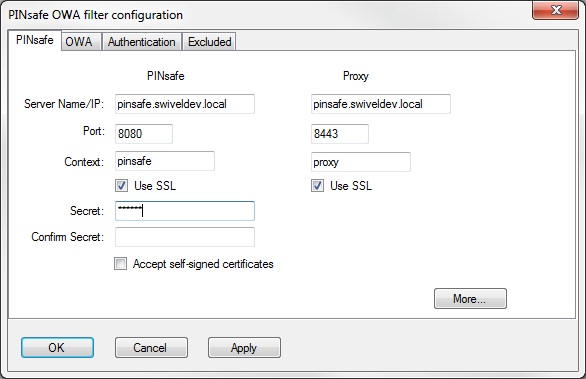
Swivel Settings
Server Name/IP: The Swivel server IP address or hostname
Port: Swivel server port, for a Swivel virtual or hardware appliance use 8080 (not 8443)
Context: Swivel install name, for a Swivel virtual or hardware appliance use Swivel (not proxy)
Use SSL Select tick box if SSL is used, for a Swivel virtual or hardware appliance tick this box. This also ignores other certificate errors, such as site names not matching.
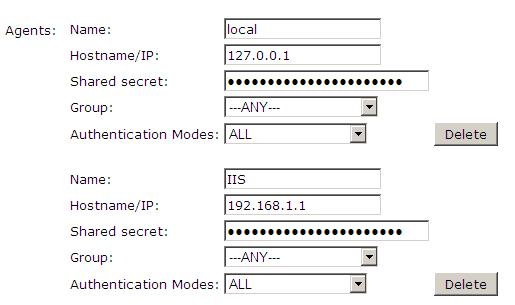
Secret: The shared secret that must be entered also on the Swivel server Administration Console under Server/Agents
Accept self-signed certificates Where SSL is used with self signed certificates, for a Swivel virtual or hardware appliance tick this box until a valid certificate is installed.
Proxy Server These are used to retrieve TURing or PINpad images. If you are using a version of Swivel that does not support Pinpad natively (3.9 or earlier), you will need the special version of the virtual or hardware appliance proxy that does support Pinpad. If you are not using Pinpad, you can set these to be the same as the first set of values: if you are not using an virtual or hardware appliance, you MUST set them to be the same.
Proxy Port: Swivel server port, for a Swivel virtual or hardware appliance use 8443
Proxy Context: Swivel install name, for a Swivel virtual or hardware appliance use proxy
Proxy Use SSL Select tick box if SSL is used, for a Swivel virtual or hardware appliance tick this box. This also ignores other certificate errors, such as site names not matching.
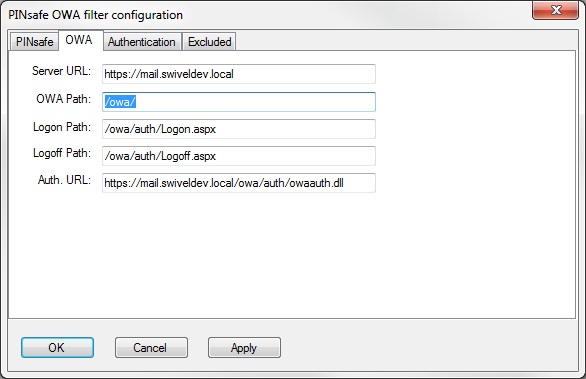
OWA Settings
Server URL: Exchange Server URL, Example: https://<exchange.mycompany.com>
OWA Path: OWA path, usually /owa, unless this has been explicitly changed
Logon Path: Logon path Usually /owa/Logon.aspx
Logoff Path: Logoff path /owa/Logoff.aspx
Auth. URL: This is the URL for OWA authentication and is usually https://<exchange.mycompany.com>/owa/auth/owaauth.dll
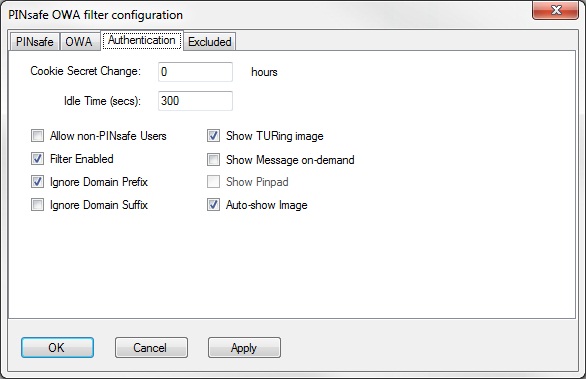
Authentication Settings
Cookie Secret Change: This is an experimental setting, which increases security by changing the secret used to encrypt the authentication cookie at a specified interval. It is recommended that you leave this at 0, i.e. never change it. In particular, do not change this if you have multiple OWA servers, as it will cause problems.
Idle Time: The length of time in seconds that the authentication cookie is valid, provided you make no OWA requests in that time. If you do, the cookie is refreshed and the countdown starts again.
Allow non-PINsafe Users If this option is ticked, non Swivel users are allowed to authenticate using standard OWA authentication. This requires Swivel 3.5 or higher. The option to allow unknown users to authenticate without Swivel authentication only applies to users not known to Swivel at all. You cannot specify that it only applies to a group of users, and not to other users who are known to Swivel, but not in a particular group.
Filter Enabled The filter enabled option is mainly for testing, but also to handle situations such as enabling mobile access to the same Exchange Server i.e. ActiveSync and Windows Mobile Device Center. If the filter is disabled, you still need to authenticate through Swivel if you use the standard login page, but it is possible to authenticate using only AD credentials if you have a way to call the AD authentication filter directly.
Ignore Domain Prefix If this option is ticked, any prefixed domain (i.e. anything before the '\' character) is removed before sending the username to PINsafe. The full username is sent to OWA.
Ignore Domain Suffix If this option is ticked, any suffixed domain (i.e. anything after the '@' character) is removed before sending the username to PINsafe. The full username is sent to OWA.
Show TURing image If this option is ticked, a TURing image is shown to authenticate users.
Show Message on-demand If this option is ticked, a button is displayed to request a security string to be sent via SMS or email.
Show Pinpad If this option is ticked, an Pinpad button array is shown to authenticate users. You cannot have both TURing and Pinpad enabled.
Auto-show image If this option is ticked, the TURing or Pinpad image is requested as soon as the user enters the username and tabs away from it. If this option is not ticked, the user must click a button to show the image.
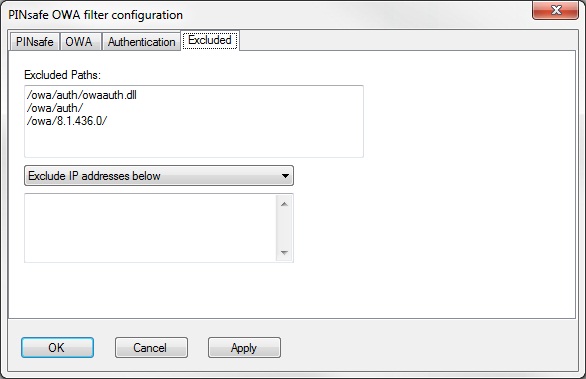
Excluded Settings
Excluded Paths: This allows paths to be set for which authentication is not required to reach them. The paths shown on the display are added by default. The configuration program automatically detects the current build of OWA and includes that.
Excluded/Included IP addresses: You can choose to enable PINsafe authentication only for certain source IP addresses. Typically, you will do this if you wish to allow internal access to OWA without PINsafe authentication. Selecting "Exclude IP addresses below" will exclude the listed addresses from PINsafe authentication, while "Only include IP addresses below" will apply PINsafe authentication only to those IP addresses listed. For example, if you know that all external requests will come via a firewall at 192.168.0.99, you can select “Only include IP addresses below”, and enter the single IP address as the address to include. Note that you can enter IP address ranges here using CIDR notation, for example 192.168.0.0/24 or 192.168.0.0/255.255.255.0. PINsafe will always display addresses using the latter format, irrespective of how they are entered. IPv6 addresses are not currently supported.
Configure The PINsafe Server
Configure a PINsafe Agent (For standard XML Authentication)
1. On the PINsafe Management Console select Server/Agent
2. Enter a name for the Agent
3. Enter the Exchange IP address
4. Enter the shared secret used above on the Exchange Filter
5. Click on Apply to save changes
Configure Single Channel Access
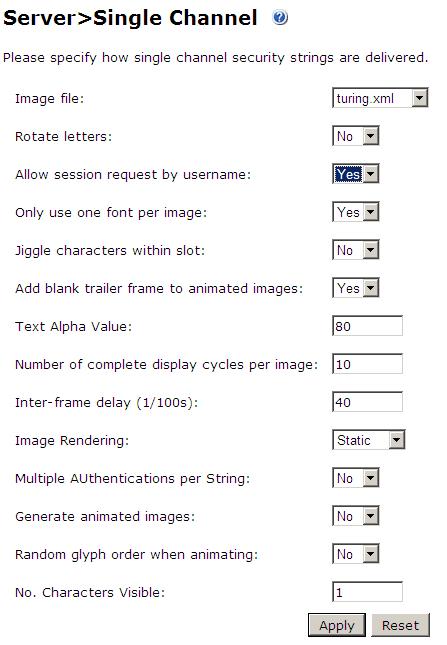
1. On the PINsafe Management Console select Server/Single Channel
2. Ensure ‘Allow session request by username’ is set to YES
Additional Installation Options
Modifying the login Page to stop the Single Channel Image automatically appearing
NOTE: this section refers to earlier versions of the filter. In version 2.6 or later, this can be set using the configuration program.
By default the single channel authentication will appear when the username and AD password is entered and the user selects the OTC field. As a single channel session has started the PINsafe server is expecting an OTC to be entered from the Single Channel TURing image. If dual channel authentication is required then the automatic display of the Single Channel Turing image needs to be turned off. This can be done by modifying the login.asp file which by default is located in C:\Program Files\Exchsrvr\exchweb\bin\auth. The following needs to be removed from the username attribute field:
onblur=”checkUser()”
Modifying the login Page to allow Dual Channel On Demand Delivery
If you want to use only dual-channel on-demand and no other method, then you can manage this by a simple change to image.asp (under /exchweb/bin/auth). Edit this file, search for "SCImage" and replace it with "DCMessage". Leave the onblur attribute as it was. Dual channel authentication for the user and also On Demand Delivery should be enabled on the PINsafe Administration console under Server/Dual Channel.
Verifying the Installation
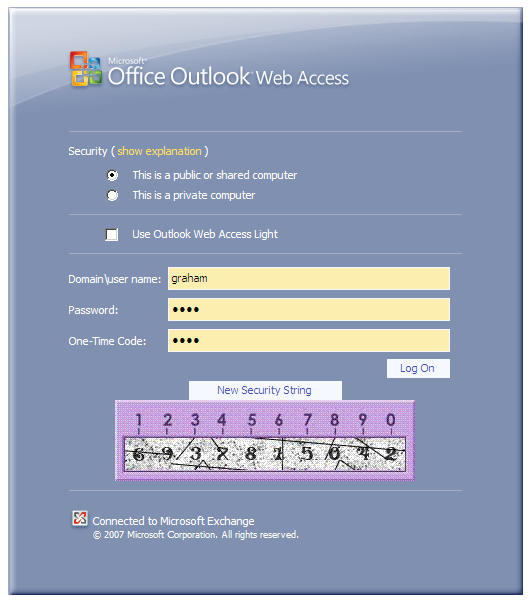
Enter a username and AD password then the PINsafe OTC for dual channel authentication. For single channel authentication enter the username, AD password then click on the button to generate a Single Channel Turing Security String, enter the OTC and login.
NOTE: if you have checked the option to allow non-PINsafe users, the OTC field and TURing button/image will not be displayed until you enter a username. If the username is not known to PINsafe, these elements will not appear. Similarly, if you have restricted the IP addresses to which PINsafe applies, the additional fields will not be displayed if PINsafe authentication is not required.
Uninstalling the PINsafe Integration
Uninstall the PINsafe IIS filter then, the original Logon.aspx must be restored by renaming Logon.asp.old to Logon.aspx.
Note that the installation creates a new Logon.aspx file in ClientAccess\owa\auth\, and renames the original to login.aspx.sav. To complete uninstallation this file must be copied back again.
Troubleshooting
Check the PINsafe and 2007 server logs
Logon page takes a long time to load. The first time the OWA modification is started, the PINsafe page may take a while to load.
No login page, check the Exchange version in <path to Exchange>\ClientAccess\Owa
Look for folders consisting of 4 numbers separated by dots, for example "8.3.213.0". The first number will always be "8" for OWA 2007. You will need to ensure that the highest such folder is included in the list of excluded paths. In version 2.6 or higher, this should be handled automatically.
In version 2.0 of the filter, the file login.aspx needs to be modified so that it references the correct exchange install version. A program to automatically modify the login page is here. In versions 2.3 and higher, logon page modification is automatic.
1. Unzip and copy to <path to Exchange>\ClientAccess\Owa\auth.
2. Rename logon.aspx logon.aspx.current, rename logon.aspx.bk logon.aspx.
3. Open a command prompt and change directory to <path to Exchange>\ClientAccess\Owa\auth and run the OWAModifyLogonfor IIS program from in command line specifying logon.aspx i.e. OWAModifylogonforIIS.exe logon.aspx. If the option to allow authentication for non PINsafe users is being used then use the option switch true, e.g. OWAModifylogonforIIS.exe logon.aspx true. Using the option switch false will stop non PINsafe user authentication.
4. Check the file has been modified by the datestamp which should have changed for logon.aspx.
5. On the PINsafe IIS Filter Update the PINsafe filter under the Excluded path using the highest OWA version.
Red Cross instead of Turing image, right click on red cross and look at its properties. Ensure PINsafe server is running.
If you do not see a Turing image when using start session then in a web browser test the following link from the IIS server. If an image is not seen, then there is a problem either with communicating with the PINsafe server or the Allow Image request by username may be set to No.
For Swivel virtual or hardware appliances:
https://<pinsafe_server_ip>:8443/proxy/SCImage?username=<username>
For a software only install see Software Only Installation
Blank page after an authentication. A login page may be displayed on the Exchange server. Verify the settings on the PINsafe filter point to the DNS name:
Server URL: Exchange Server URL, Example: https://<exchange.mycompany.com>
Auth. URL: This is the URL for OWA authentication and the is usually https://<exchange.mycompany.com>/owa/auth/owaauth.dll
User regularly times out after a short interval
The session is kept open by user activity. If this is insufficient then increase the cookie idle timeout value.
Name resolution issue
The Exchange server may be looking for exchange.company.com from the internal network but cannot resolve it. Edit the hosts file mapping the name to 127.0.0.1. Note that because of security restrictions in OWA, the OWA server must be referred to by name, not by IP address, and the SSL certificate must be valid, and must be for the named host.
Known Issues and Limitations
Updates to the OWA 2007 server may require changes to the Excluded paths. You will also probably need to reapply the logon page changes.
If you wish to use the PINsafe filter with dual channel authentication, on demand or in advance, the logon page will need to be manually modified. Please contact Swivel support (support@swivelsecure.com) for more information.
Additional Information
For assistance in the PINsafe installation and configuration please firstly contact your reseller and then email Swivel Secure support at support@swivelsecure.com
